
Section 1.2.3 · Chapter 1: Introduction
Project Manager
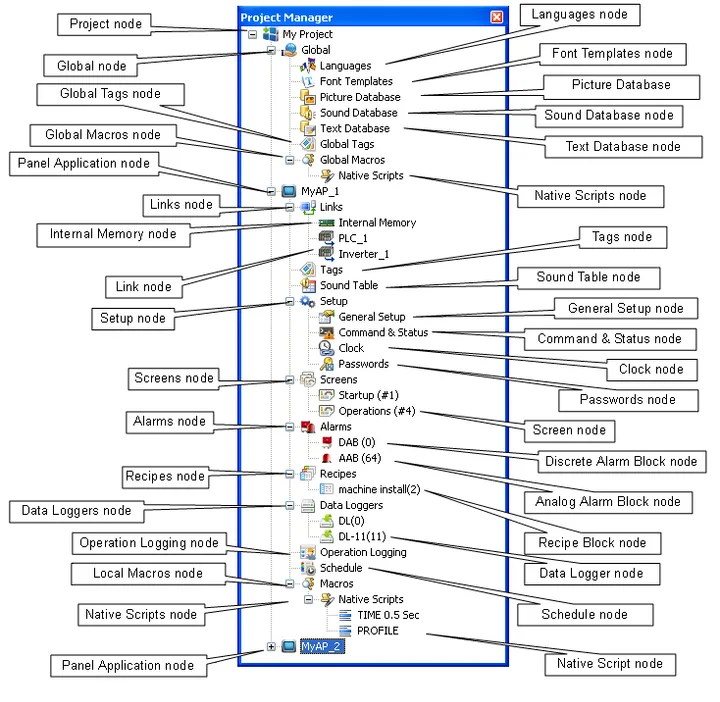
The Project Manager is a dockable window with a project tree. You can manage your project with it easily. To open the Project Manager, check the Project Manager menu item in the View menu. The following is an example of the Project Manager. In this example, the project My Project has two panel applications: MyAP_1 and MyAp_2.
Project Node ( )
The label of the Project node is the project name. You can do the following with the Project node:
1) Double-click it to open the Project Information & Protection dialog box.
2) Right-click it to get a pop-up menu with the following menu items:
|
Menu Item |
Description |
|---|---|
| Add Panel Application... | Create a new panel application. |
| Import Panel Application... | Import a panel application from a PLF file. |
| Information | Open the Project Information & Protection dialog box. |
| Toggle All | Expand all the collapsed lists of sub-nodes and collapse all the expanded lists of sub-nodes. |
Global Node ( )
The Global node has seven sub-nodes. You can do the following
with the Global node:
1) Double-click it to expand or collapse the list of its sub-nodes.
Languages Node ( )
You can do the following with the Languages node:
1) Double-click it to open the Languages dialog box.
2) Right-click it to get a pop-up menu with the following menu item:
|
Menu Item |
Description |
|---|---|
| Properties... | Open the Languages dialog box. |
Font Templates Node ( )
You can do the following with the Font Templates node:
1) Double-click it to open the Font Templates dialog box.
2) Right-click it to get a pop-up menu with the following menu item:
|
Menu Item |
Description |
|---|---|
| Properties... | Open the Font Templates dialog box. |
Picture Database Node ( )
You can do the following with the Picture Database node:
1) Double-click it to open the Picture Database dialog box.
2) Right-click it to get a pop-up menu with the following menu item:
|
Menu Item |
Description |
|---|---|
| Properties... | Open the Picture Database dialog box. |
Sound Database Node ( )
You can do the following with the Sound Database node:
1) Double-click it to open the Sound Database dialog box.
2) Right-click it to get a pop-up menu with the following menu item:
|
Menu Item |
Description |
|---|---|
| Properties... | Open the Sound Database dialog box. |
Text Database Node ( )
You can do the following with the Text Database node:
1) Double-click it to open the Text Database dialog box.
2) Right-click it to get a pop-up menu with the following menu item:
|
Menu Item |
Description |
|---|---|
| Open | Open the Text Database window. |
Global Tags Node ( )
You can do the following with the Global Tags node:
1) Double-click it to open the Global Tags window.
2) Right-click it to get a pop-up menu with the following menu item:
|
Menu Item |
Description |
|---|---|
| Open | Open the Global Tags window. |
Global Macros Node ( )
The Global Macros node has two sub-nodes: Native Scripts Node
and VB Scripts Node. You can do the following
with the Global Macros node:
1) Double-click it to expand or collapse the list of its sub-nodes.
Global Native Scripts Node ( )
The Global Native Scripts node can have many Global Native
Script sub-nodes.
Each Global Native Script node is associated with a global native script of the project.
You can do the following with the Global Native Scripts node:
1) Double-click it to expand or collapse the list of its sub-nodes.
2) Right-click it to get a pop-up menu with the following menu items:
|
Menu Item |
Description |
|---|---|
| Add Script... | Create a new global native script. |
| Import Script | Import a global native script from an MCR file or a TXT file. |
Global Native Script Node ( )
Each Global Native Script node is associated with a global
Native Script of
the project. You can do the following with the Global Native Script node:
1) Double-click it to open the editing window of the associated native script.
2) Right-click it to get a pop-up menu with the following menu items:
|
Menu Item |
Description |
|---|---|
| Open | Open the editing window of the associated script. |
| Close | Close the editing window of the associated script. |
| Rename | Rename the associated script. |
| Delete | Delete the associated script. |
| Export Script... | Export the associated script to an MCR file or a TXT file. |
| Join Protection | Protect a script and add it into the protection list. |
| Quit Protection | Unprotect a script and remove it from the protection list. |
| Enable Protection | Resumes the protection of all the previously protected scripts in the protection list. |
| Disable Protection | Unprotect all the protected scripts in the protection list. |
Panel Application Node ( )
The label of a Panel Application node is the associated
application name. You can do the following with the Panel Application node:
1) Double-click it to open the General Setup dialog box.
2) Right-click it to get a pop-up menu with the following menu items:
|
Menu Item |
Description |
|---|---|
| Rename | Rename the panel application. |
| Delete | Delete the panel application. |
| General Setup | Open the General Setup dialog box. |
| Export Panel Application... | Export the panel application to a PLF file. |
| Toggle All | Expand all the collapsed lists of sub-nodes and collapse all the expanded lists of sub-nodes. |
| Move Up | Move the panel application up if it is not on the top of panel application list. |
| Move Down | Move the panel application down if it is not on the bottom of panel application list. |
Links Node ( )
The Links node has one Internal Memory sub-node and can have
up to 16 Link sub-nodes. You can do the following with the Links node:
1) Double-click it to expand or collapse the list of its sub-nodes.
2) Right-click it to get a pop-up menu with the following menu items:
|
Menu Item |
Description |
|---|---|
| Add Link... | Create a new communication link. |
| Driver Link... | Open communication driver list dialog box which lists all the supported communication drivers. In the dialog box, you can export the driver list to the .csv file. |
Internal Memory Node ( )
You can do the following with the Internal Memory node:
1) Double-click it to open the Internal Memory dialog box.
2) Right-click it to get a pop-up menu with the following menu item:
|
Menu Item |
Description |
|---|---|
| Properties... | Open the Internal Memory dialog box. |
Link Node ( )
A Link node is associated with a communication link. You can
do the following with the Link node:
1) Double-click it to open the Link Properties dialog box of the associated
communication link.
2) Right-click it to get a pop-up menu with the following menu items:
|
Menu Item |
Description |
|---|---|
| Rename | Rename the associated communication link. |
| Delete | Delete the associated communication link. |
| Properties... | Open the Link Properties dialog box of the associated communication link. |
Tags Node ()
You can do the following with the Tags node:
1) Double-click it to open the Tags window.
2) Right-click it to get a pop-up menu with the following menu item:
|
Menu Item |
Description |
|---|---|
| Open | Open the Tags window. |
Sound Table Node ( )
You can do the following with the Sound Table node:
1) Double-click it to open the Sound Table dialog box.
2) Right-click it to get a pop-up menu with the following menu item:
|
Menu Item |
Description |
|---|---|
| Properties... | Open the Sound Table dialog box. |
Setup Node ( )
The Setup node has four sub-nodes. You can do the following
with the Setup node:
1) Double-click it to expand or collapse the list of its sub-nodes.
General Setup Node ( )
You can do the following with the General Setup node:
1) Double-click it to open the General Setup dialog box.
2) Right-click it to get a pop-up menu with the following menu item:
|
Menu Item |
Description |
|---|---|
| Properties... | Open the General Setup dialog box. |
Command & Status Node ( )
You can do the following with the Command & Status node:
1) Double-click it to open the Command & Status dialog box.
2) Right-click it to get a pop-up menu with the following menu item:
|
Menu Item |
Description |
|---|---|
| Properties... | Open the Command & Status dialog box. |
Clock Node ( )
You can do the following with the Clock node:
1) Double-click it to open the Clock dialog box.
2) Right-click it to get a pop-up menu with the following menu item:
|
Menu Item |
Description |
|---|---|
| Properties... | Open the Clock dialog box. |
Passwords Node ( )
You can do the following with the Passwords node:
1) Double-click it to open the Passwords dialog box.
2) Right-click it to get a pop-up menu with the following menu item:
|
Menu Item |
Description |
|---|---|
| Properties... | Open the Passwords dialog box. |
Screens Node ( )
The Screens node can have many Screen sub-nodes. Each Screen
sub-nodes is associated with a screen of the panel application. You can do the
following with the Screens node:
1) Double-click it to expand or collapse the list of its sub-nodes.
2) Right-click it to get a pop-up menu with the following menu items:
|
Menu Item |
Description |
|---|---|
| New Screen... | Create a new screen. |
| Import Screen... | Import a screen from an SNF file. |
| Sort by Name | Sort the list of Screen sub-nodes by the screen name. |
| Sort by Number | Sort the list of Screen sub-nodes by the screen number. |
| Close All Screens | Close all opened screens. |
| Save Screens as Pictures... | Open the Save Screens as Pictures dialog box. You can save each of the selected screens to a picture file using the dialog box. |
Screen sub-Node ( )
Each Screen sub-Node is associated with a screen of the panel
application. You can do the following with the Screen sub-node:
1) Double-click it to open the associated screen if the screen is not opened
yet.
2) Double-click it to open the property sheet of the associated screen if the
screen is already opened.
3) Right-click it to get a pop-up menu with the following menu items:
|
Menu Item |
Description |
|---|---|
| Open | Open the associated screen. |
| Delete | Delete the associated screen. |
| Properties | Open the property sheet of the associated screen. |
| Export Screen... | Export the associated screen to an SNF file. |
| Join Protection | Protect a screen and add it into the protection list. |
| Quit Protection | Unprotect a screen and remove it from the protection list. |
| Enable Protection | Resumes the protection of all the previously protected screens in the protection list. |
| Disable Protection | Unprotect all the protected screens in the protection list. |
Alarms Node ( )
The Alarms node can have many Discrete Alarm Block sub-nodes
and Analog Alarm Block sub-nodes. You can do the following with the Alarms node:
1) Double-click it to open the Alarm Properties dialog box.
2) Right-click it to get a pop-up menu with the following menu items:
|
Menu Item |
Description |
|---|---|
| Add Discrete Alarm Block | Create a new discrete alarm block. |
| Add Analog Alarm Block | Create a new analog alarm block. |
| Properties | Open the Alarm Properties dialog box. |
| Export Alarm Blocks... | Open the Export Alarm Blocks dialog box to export the associated alarm block or all alarm blocks to a CSV file or XML file. |
| Import Alarm Blocks... | Import an alarm block from an ALM file or a CSV file or a XML file. |
Discrete Alarm Block Node ( )
A Discrete Alarm Block node is associated with a discrete
alarm block of the panel application. You can do the following with the Discrete
Alarm Block node:
1) Double-click it to open the Discrete Alarm Block dialog box of the associated
alarm block.
2) Right-click it to get a pop-up menu with the following menu items:
|
Menu Item |
Description |
|---|---|
| Delete | Delete the associated discrete alarm block. |
| Properties | Open the Discrete Alarm Block dialog box of the associated discrete alarm block. |
Analog Alarm Block Node ( )
An Analog Alarm Block node is associated with an analog alarm
block of the panel application. You can do the following with the Analog Alarm
Block node:
1) Double-click it to open the Analog Alarm Block dialog box of the associated
alarm block.
2) Right-click it to get a pop-up menu with the following menu items:
|
Menu Item |
Description |
|---|---|
| Delete | Delete the associated analog alarm block. |
| Properties | Open the Analog Alarm Block dialog box of the associated analog alarm block. |
Recipes Node ( )
The Recipes node can have many Recipe Block sub-nodes. Each
Recipe Block sub-node is associated with a recipe block of the panel
application. You can do the following with the Recipes node:
1) Double-click it to expand or collapse the list of its sub-nodes.
2) Right-click it to get a pop-up menu with the following menu item:
|
Menu Item |
Description |
|---|---|
| Add Recipe Block | Create a new recipe block. |
| Export... | Open the Export Recipes dialog box. You can export the selected recipes to a RBF file. |
| Import... | Import a recipe from a RBF file. |
Recipe Block Node ( )
A Recipe Block node is associated with a recipe block of the
panel application. You can do the following with the Recipe Block node:
1) Double-click it to open the Recipe Block dialog box of the associated recipe
block.
2) Right-click it to get a pop-up menu with the following menu items:
|
Menu Item |
Description |
|---|---|
| Delete | Delete the associated recipe block. |
| Properties | Open the Recipe Block dialog box of the associated recipe block. |
Data Loggers Node ( )
The Data Loggers node can have many Data Logger sub-nodes. Each Data Logger
sub-node is associated with a data logger of the panel application. You can do
the following with the Data Loggers node:
1) Double-click it to expand or collapse the list of its sub-nodes.
2) Right-click it to get a pop-up menu with the following menu items:
|
Menu Item |
Description |
|---|---|
| Add Data Logger | Create a new data logger. |
| Export... | Open the Export Data Loggers dialog box. You can export the selected data loggers to a DLF file. |
| Import... | Import a data logger from a DLF file. |
Data Logger Node ( )
A Data Logger node is associated with a data logger of the
panel application. You can do the following with the Data Logger node:
1) Double-click it to open the Data Logger dialog box of the associated recipe
block.
2) Right-click it to get a pop-up menu with the following menu items:
|
Menu Item |
Description |
|---|---|
| Delete | Delete the associated data logger. |
| Properties | Open the Data Logger dialog box of the associated data logger. |
Operation Logging Node ( )
You can do the following with the Operation Logging node:
1) Double-click it to open the Operation Logging dialog box.
2) Right-click it to get a pop-up menu with the following menu items:
|
Menu Item |
Description |
|---|---|
| Properties... | Open the Operation Logging dialog box. |
Schedule Node ( )
You can do the following with the Schedule node:
1) Double-click it to open the Schedule dialog box.
2) Right-click it to get a pop-up menu with the following menu item:
|
Menu Item |
Description |
|---|---|
| Properties... | Open the Schedule dialog box. |
| Export... | Export the schedule to a SCF file. |
| Import... | Import a schedule from a SCF file. |
Macros Node ()
The Macros node has two sub-nodes: Native Scripts Node and VB
Scripts Node. You can do the following
with the Macros node:
1) Double-click it to expand or collapse the list of its sub-nodes.
Native Scripts Node ()
The Native Scripts node can have many Native Script sub-nodes. Each
Native Script
sub-node is associated with a native script of the panel application. You can do the
following with the Native Scripts node:
1) Double-click it to expand or collapse the list of its sub-nodes.
2) Right-click it to get a pop-up menu with the following menu items:
|
Menu Item |
Description |
|---|---|
| Add Script... | Create a new script. |
| Import Script | Import a macro from an MCR file or a TXT file. |
Native Script Node ()
Each Native Script node is associated with a Native Script of
the panel application. You can do the following with the Native Script node:
1) Double-click it to open the editing window of the associated script.
2) Right-click it to get a pop-up menu with the following menu items:
|
Menu Item |
Description |
|---|---|
| Open | Open the editing window of the associated macro. |
| Close | Close the editing window of the associated macro. |
| Rename | Rename the associated macro. |
| Delete | Delete the associated macro. |
| Export Script | Export the associated macro to an MCR file or a TXT file. |
| Join Protection | Protect a script and add it into the protection list. |
| Quit Protection | Unprotect a script and remove it from the protection list. |
| Enable Protection | Resumes the protection of all the previously protected scripts in the protection list. |
| Disable Protection | Unprotect all the protected scripts in the protection list. |
Need PM Designer itself?
V4 for current PK, PT, ITV and PM panels, V2 for older models. Free, sent by email.
Source.Section 1.2.3 of the PM Designer Software User Manual, Edition 2.0, © Cermate Technologies Inc. (www.cermate.com, service@cermate.com). Reproduced online, with the manual's own figures, by TSL Automation Solutions, authorised Cermate distributor, for users of Cermate HMI panels. PM Designer and PanelMaster are trademarks of Cermate Technologies Inc.
Text and figures are the manufacturer's and may describe features your panel or software version does not have. For a plain-language introduction read the PM Designer guide; for help with a specific panel contact TSL Automation.