
Section 16.2.2 · Chapter 16: Schedule
Schedule Details Dialog Box
In the Schedule Details dialog box, you can specify the Start Time/Date, End Time/Date, Start Value, and End Value of a schedule. To open the Schedule Details dialog box of a schedule, click the Edit button of the schedule in the Schedule dialog box.
Note: The schedules for normal days will be in effect on a special day if the schedule of the special day is disabled.
To disable a special day, you need to disable it before that day. For example, if a special day is 9/13, you have to disable the special day before 00:00:00 of 9/13.
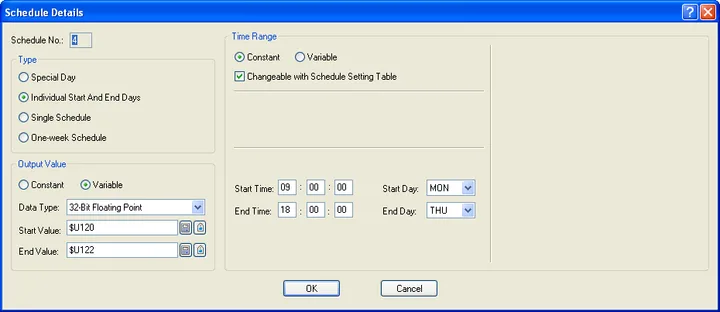
Example 1
- The time range starts at 09:00:00 on Monday and ends at 18:00:00 on Thursday.
- The operators are allowed to modify the time range by using the Schedule Setting Table at runtime.
- The Start Value and End Value are floating point numbers. When the schedule starts, the HMI outputs the Start Value read from the internal words $U120 and $U121 to the specified Write Address. When the schedule ends, the HMI outputs the End Value read from the internal words $U122 and $U123 to the specified Write Address.
Example 2
-
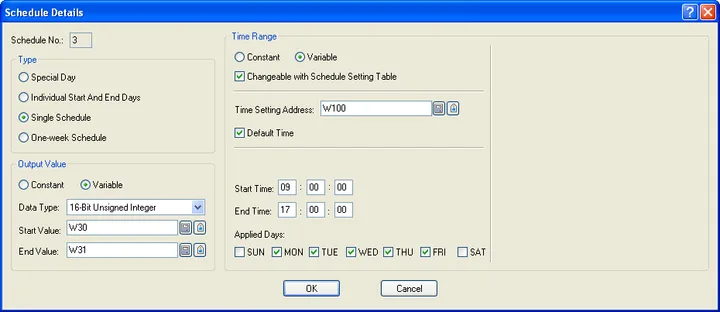
The time range can be set by a device/PLC. The memory block starts at W100 of the PLC will be used for setting the time range.
-
Before a valid time range is set at runtime, the default time range specified in the dialog box will be used. The default time range starts at 09:00:00 and ends at 17:00:00 on every weekday.
-
The operators are allowed to modify the time range by using the Schedule Setting Table at runtime.
-
The Start Value and End Value are 16-bit unsigned integers. When the schedule starts, the HMI outputs the Start Value read from the PLC word location W30 to the specified Write Address. When the schedule ends, the HMI outputs the End Value read from the PLC word location W31 to the specified Write Address.
Example 3
-
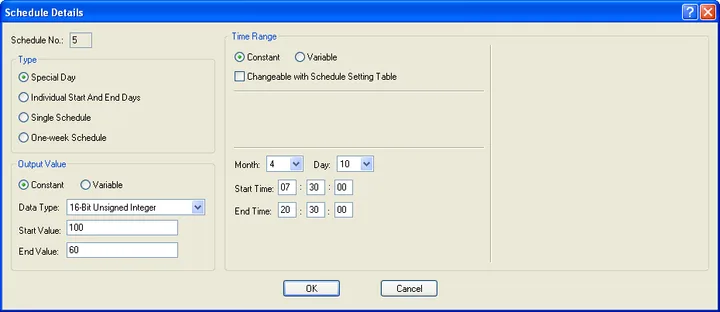
The time range starts at 07:30:00 and ends at 20:30:00 on April 10.
-
It is not allowed to modify the time range in the Schedule Setting Table at runtime.
-
The Start Value and End Value are 16-bit unsigned integers. When the schedule starts, the HMI writes 100 to the specified Write Address. When the schedule ends, the HMI writes 60 to the specified Write Address.
Example 4
-
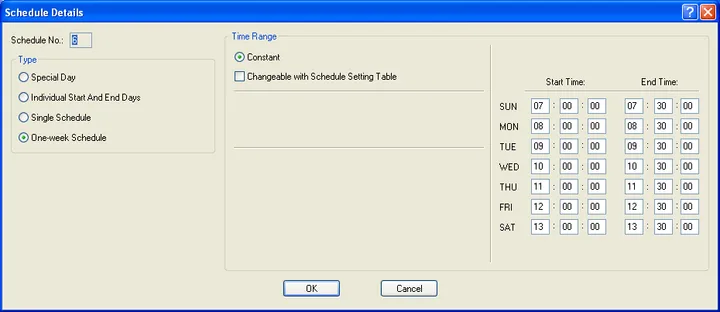
The start time and end time of a week is set in the dialog. For example, the time range starts at 07:00:00 and ends at 07:30:00 on Every Sunday.
-
It is not allowed to modify the time range in the Schedule Setting Table at runtime.
The following describes the items in the Schedule Details dialog box.
|
Item |
Description | ||
|---|---|---|---|
| Schedule No. | The number of the concerned schedule. The field is read only. | ||
| Type | Special Day | Select to make the schedule valid only for the specified day. | |
| Individual start and end days | Select to indicate that the start day and end day of the schedule are different. | ||
| Single Schedule | Select to make a single schedule. | ||
| One-week Schedule | Select to make an one-week schedule. | ||
| Output Value | Constant | Select this item to indicate that the start value and the end value are constants. | |
| Variable | Select this item to indicate that the start value and the end value are to be read from the specified addresses. | ||
| Data Type | Specify the data type of the start and end values. | ||
| Start Value | Specify the start value or the address to get the start value. | ||
| End Value | Specify the end value or the address to get the end value. | ||
| Time Range | Constant | Select to make the time range non-settable by a device/PLC. | |
| Variable | Select to make the time range settable by a device/PLC. | ||
| Changeable with Schedule Setting Table | Select to allow the operators to change the time range by using the Schedule Setting Table at runtime. | ||
| Time Setting Address | Specify the starting address of the Time Setting Block that the device/PLC will use to set the time range of the schedule. See Section 16.2.3 for the details of the Time Setting Block. | ||
| Default Time | Select to allow the schedule to have a default time range. This item is visible only when the Variable is selected for the Time Range. The HMI will use the default time range for the schedule if there is no valid time range set by the PLC or by the operator yet. | ||
| Month | The month of the Special Day. | ||
| Day | The day of the Special Day. | ||
| Start Time | The start time of the schedule. | ||
| Start Day | The start day of the schedule. The item is visible when the “Individual start and end days” is selected. | ||
| End Time | The end time of the schedule. | ||
| End Day | The end day of the schedule. The item is visible when the “Individual start and end days” is selected. | ||
| Applied Days | Select the day or days in a week that the schedule will apply. | ||
Need PM Designer itself?
V4 for current PK, PT, ITV and PM panels, V2 for older models. Free, sent by email.
Source.Section 16.2.2 of the PM Designer Software User Manual, Edition 2.0, © Cermate Technologies Inc. (www.cermate.com, service@cermate.com). Reproduced online, with the manual's own figures, by TSL Automation Solutions, authorised Cermate distributor, for users of Cermate HMI panels. PM Designer and PanelMaster are trademarks of Cermate Technologies Inc.
Text and figures are the manufacturer's and may describe features your panel or software version does not have. For a plain-language introduction read the PM Designer guide; for help with a specific panel contact TSL Automation.