
Section 2.3.3.3 · Chapter 2: Creating Projects
Data Type Window
Data Type window displays all the supported data types related to the selected link.
The following table describes each attribute of the data type.
|
Item |
Description |
|---|---|
| Name | Shows the name for the data type. |
| Data Type | Shows the basic data type for the name. |
| Description | Shows the comment for the data type. |
Note: If the data type is a structure, you may click
 to expand or click
 to collapse the list of its members.
In the data type window, you can:
■ Switch between tag list of the selected tag group and the supported data type by clicking the window tab
■ Cut, copy, paste and delete selected data type using menu commands or key
combinations.
You can right-click the number column to display a pop-up menu of editing
commands. The editing commands available vary depending on what is selected.
The following table shows the supported editing commands.
|
Menu Command |
Key Combination | Description |
|---|---|---|
| Add | Inserts a new structure at the end of the list by using Structure Definition dialog box. | |
| Edit | Edits the selected type by using Structure Definition dialog box. | |
| Delete | DELETE | Deletes data types without copying it to the Clipboard. You cannot delete the data type if it is used in the application. |
| Cut | CTRL+X | Removes selected data types from the active window and saves them to the Clipboard. You cannot cut the data type if it is used in the application. |
| Copy | CTRL+C | Duplicates selected data types in the active window. |
| Paste | CTRL+V | Pastes cut or copied data types before the selection into an active window. |
Note that all editing commands require a selection in order to work. To
select a data type, click the row on its header number column. To select multiple
tags, click the row on its heard column and use Ctrl+Click to add a row to the
selection. The editing commands except Add are available only when the
selected data type is not basic data type or built-in reserved data type.
■ Add or edit a structure data type by using Structure Definition dialog box. The following is an example of the Structure Definition dialog box.
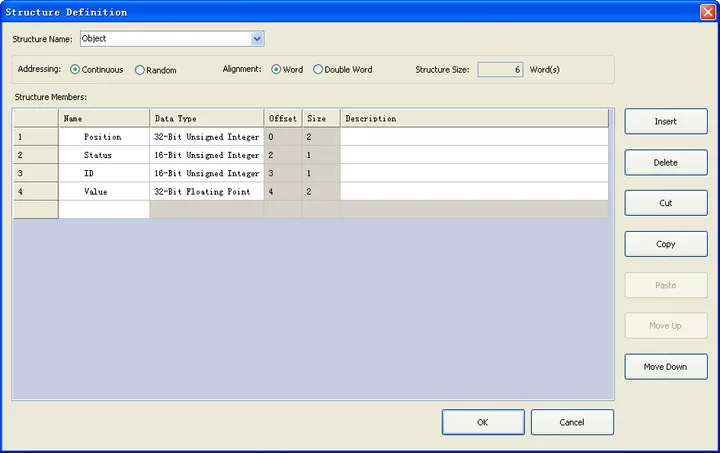
The following table describes each property in the dialog box.
|
Property |
Description |
|
|---|---|---|
| Structure Name |
Specifies the name for the structure.
The name must be unique. The name cannot start with a number and cannot be the same as the basic data type or the built-in reserved data type name. The name cannot contain any of the following characters "/\|(){}[].,'<=+>!?" and space. |
|
| Addressing | Specifies the addressing type used to allocate the structure. There are two types: | |
| Type | Description | |
| Continuous | Select Continuous to create a structure with continuous word or double word addresses. | |
| Random | Select Random to create a structure with random addresses. | |
| Alignment | Select Word to make each member word aligned or select Double Word to make each member double word aligned. Only available for the continuous addressing. | |
| Structure Size | The total size of the structure in word. | |
| Structure Members | Specifies the structure's members in the following list. | |
| Item | Description | |
| No. | The number of the structure member. | |
| Name | Specifies the name for the member. | |
| Data Type | Click the icon to bring up the Select Data Type dialog box and select the desired data type for the member | |
| Offset | Available when the continuous addressing is checked. Shows the address offset offset in the structure. | |
| Size | The size in word of the member. | |
| Description | Type a comment for the structure member. | |
| Insert | Insert a member before the selection. This button is available when the selection is made. | |
| Delete/Cut/Copy | Delete/Cut/Copy all the selections. This button is available when the selection is made. | |
| Paste | Paste cut or copied member before the selection. This button is available when the selection is made. | |
| Move Up | Move the selection one item down in the list. This button is available when the selection is made. | |
| Move Down | Move the selection one item up in the list. This button is available when the selection is made. | |
| OK | Click it to close the dialog box and accept all changes. | |
| Cancel | Click it to close the dialog box and discard all changes. | |
Need PM Designer itself?
V4 for current PK, PT, ITV and PM panels, V2 for older models. Free, sent by email.
Source.Section 2.3.3.3 of the PM Designer Software User Manual, Edition 2.0, © Cermate Technologies Inc. (www.cermate.com, service@cermate.com). Reproduced online, with the manual's own figures, by TSL Automation Solutions, authorised Cermate distributor, for users of Cermate HMI panels. PM Designer and PanelMaster are trademarks of Cermate Technologies Inc.
Text and figures are the manufacturer's and may describe features your panel or software version does not have. For a plain-language introduction read the PM Designer guide; for help with a specific panel contact TSL Automation.