
Section 12.4.1 · Chapter 12: Alarms and Alarm Displays
Discrete Alarm Block - Settings
Use the dialog box to define all the settings for a discrete alarm block. The following is an example of the discrete alarm block dialog.
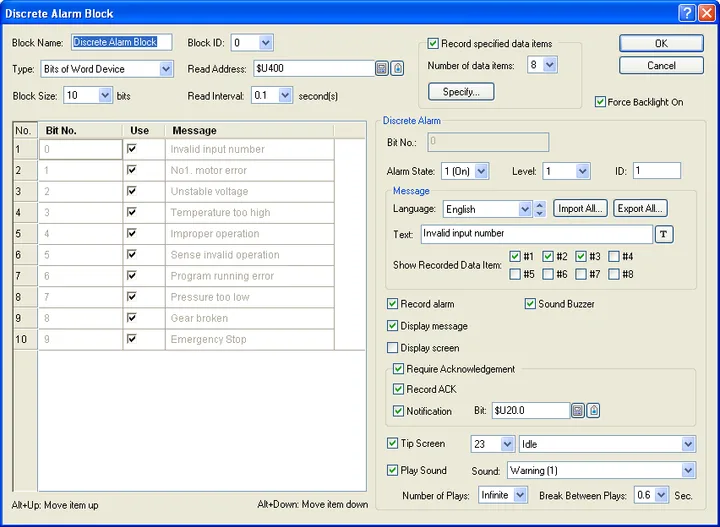
The table below describes some properties in the Discrete Alarm Block dialog.
|
Property |
Description | ||
|---|---|---|---|
| Block Name | The discrete alarm block's name. The maximum length of the name is 20 characters. | ||
| Block ID | The discrete alarm block’s ID number. Select a number between 0 and 63. The number is unique among all discrete alarm blocks of the panel application. | ||
| Type | Specifies the memory type used to allocate the discrete alarm block. There are four types: | ||
| Type | Description | ||
| Bits | Select Bits to create a discrete alarm block starting from the bit device M with N continuous bits | ||
| Bits of Word Device | Select Bits of Word Device to create a discrete alarm block starting from the bit 0 of the word device M with N continuous bits of the word device. | ||
| Word Value | Select Word Value to create a discrete alarm block at word device M. An alarm will occur if the value of M is between 0 and N. | ||
| Random Bits | Select Random Bits to create a discrete alarm block with N specified random bits. | ||
| Legend: M: An address specified in Read Address field. N: A size specified in Block Size/Maximum field. | |||
| Read Address |
Specifies the starting address of an alarm block to
monitor the status of alarms. Click  to enter an address for this field. Click  to select a tag for this field. |
||
| Block Size / Maximum | Specifies the block size of an alarm block. The unit is bit. The maximum block size or maximum value you can specify depends on the type selected. The following table lists the limitation of each type: | ||
| Type | Maximum block size/value | ||
| Bits | 256 | ||
| Bits of Word Device | 256 | ||
| Word Value | 0-511 | ||
| Random Bits | 64 | ||
| Read Interval | Specifies a period between 0.1 to 60 seconds that the panel reads the Alarm Block and checks the state of every bit in the block. The shorter the Read Interval is, the faster the alarm display object will be refreshed, but the refresh rate of other objects will be slower. | ||
| Record specified data items | <Check Box> | Check this option if you want to record the specified data values and display them in the alarm message. | |
| Number of data items | The number of data values you want to record. The maximum is 8. | ||
| Specify… | Click the button to specify the recorded data values. For details, please see Section 12.3.4 Specifying To-be-recorded Data. | ||
| Force Backlight On | Check this option so you can choose not to turn on the backlight automatically for the alarms of an alarm block. | ||
To specify all discrete alarms, you need to set the discrete
alarm list and the discrete alarm properties field. The discrete alarm list is
located at the bottom-left of the dialog, and shows all the discrete alarms in
the alarm block. The discrete alarm properties field is located at the right of
the alarm list, and shows all the properties of the selected discrete alarm.
The following table describes each column in the discrete alarm list.
|
Column |
Description |
|---|---|
| No. | The number of the discrete alarm in the alarm block. |
| Address/Bit No./Value | If the type is Bits or Random Bits, the column shows the address of the discrete alarm. If the type is Bits of Word Device, the column shows the bit no of the discrete alarm. If the type is Word Value, the column shows the value of the discrete alarm. |
| Use | Check this option if you want to use discrete alarm #n. |
| Message | Displays a specified alarm message in the selected language. To embed variable in the text of alarm message, please see 12.3.4. Specifying To-be-recorded Data.htm for details. |
You need to make a selection before editing the discrete
alarm. To select a discrete alarm, click the row of that alarm in the list. To
select multiple rows, click the row on its header column and use Ctrl + Click to
add a row to the selection.
If multiple rows are selected, any modification on the common properties such as
Level, Record alarm, Sound Buzzer, Display message, Display screen, Required
Acknowledgement, Record ACK, Notification, Tip Screen…will apply to all selected
discrete alarms
The following table describes each property of the selected discrete alarm.
|
Property |
Description | |||
|---|---|---|---|---|
| Address/Bit No./Value | Indicates the status of its corresponding alarm. The meaning of the field depends on the selected type. | |||
| Field Name | Type | Description | ||
| Address | Bits | Shows the address of the selected discrete alarm | ||
| Bit No. | Bits of Word Device | Shows the bit no. of the selected discrete alarm | ||
| Value | Word Value | Shows the value of the selected discrete alarm | ||
| Address | Random Bits |
Specifies the bit variable of the selected discrete
alarm. Click
to enter an address. Click
to select a tag. |
||
| Alarm State | Specify the alarm state to indicate the corresponding alarm is active. If 1(On) is selected, a bit with high (on) state indicates that the corresponding alarm is active. And a bit with low (off) state indicates that the corresponding alarm is clear. | |||
| Level | Select a level for the alarm between 1 and 8. | |||
| ID | Specifies the alarm ID. The maximum length of the ID is 6 characters. | |||
| Message | Language | Select an existing language that you are setting the message to. | ||
| Import All… | Click the button to import the texts of *.csv files, and save the texts as the alarm messages for the current language. | |||
| Export All… | Click the button to export all the messages for the selected language to a *.csv file. | |||
| Text | Specifies the text for the current language. The text will be shown when the alarm is active. | |||
| Show Recorded Data Item | Check the specified value you want to record and display in the alarm message. Note that only the selected value will be recorded. | |||
| Record alarm | Check this option if you want to record the alarm to the alarm display object. | |||
| Sound Buzzer | Check this option if you want the panel to play the sound buzzer when the alarm is activated or cleared. | |||
| Display message | Check this option if you want the panel to automatically display a message when the alarm is activated or cleared. This field can be checked only when Display screen is unchecked. | |||
| Display screen | <Check Box> | Check this option if you want the panel to automatically display a window screen when the alarm is activated or cleared. This field can be checked only when Display message is unchecked. | ||
| Select a window screen to display when the alarm is activated or cleared. The field is available when Display Screen is selected. Note that only Window Screens will be available to choose from. | ||||
| Required Acknowledgement | <Check Box> | Check this option if you want the operator to acknowledge an alarm. When an alarm becomes active, the panel displays an alarm message or a screen with ACK button when the Required Acknowledgement option is selected. The operator should press the ACK button to acknowledge the alarm, and have the panel refresh the current screen. This field is available when either Display message or Display screen is selected. | ||
| Record ACK | Check this option if you want to record ACK to the alarm display object | |||
| Notification |
Check this option if you want to notify the specified
bit when the ACK button is clicked. Click
to enter an address. Click
to select a tag. |
|||
| Bit | Specifies the bit that receives the notification. | |||
| Tip Screen | <Check Box> | Check this option if you want to display a screen when you select the corresponding alarm on the alarm display object. | ||
| Select a window screen as the tip screen. | ||||
| Play Sound | <Check Box> | Check this option if you want the panel to play sound when the alarm is activated or cleared. | ||
| Sound | Select a sound from sound table of the current panel application. | |||
| Number of Plays | Specifies how many times you want to play the sound. | |||
| Break Between Plays | Specifies an interval between two plays. You can select 0s, 0.2s, 0.4s, 0.6s, 0.8s, 1s, 2s, 3s, 4s, 5s. | |||
Need PM Designer itself?
V4 for current PK, PT, ITV and PM panels, V2 for older models. Free, sent by email.
Source.Section 12.4.1 of the PM Designer Software User Manual, Edition 2.0, © Cermate Technologies Inc. (www.cermate.com, service@cermate.com). Reproduced online, with the manual's own figures, by TSL Automation Solutions, authorised Cermate distributor, for users of Cermate HMI panels. PM Designer and PanelMaster are trademarks of Cermate Technologies Inc.
Text and figures are the manufacturer's and may describe features your panel or software version does not have. For a plain-language introduction read the PM Designer guide; for help with a specific panel contact TSL Automation.