
Section 12.2 · Chapter 12: Alarms and Alarm Displays
Setting Up Alarm Processing
You can set up the alarm processing with the Alarm Properties dialog box. In this dialog, you can determine the required memory for the alarm logging buffer, choose the default color and font for the alarm message, specify how to save the alarm history records to a text file and configure the global alarm marquee if you want to display it on the screen. To open the dialog box for alarm processing, please double click the node named Alarms in the Project Manager tool window. The following is an example of the Alarm Properties dialog box.
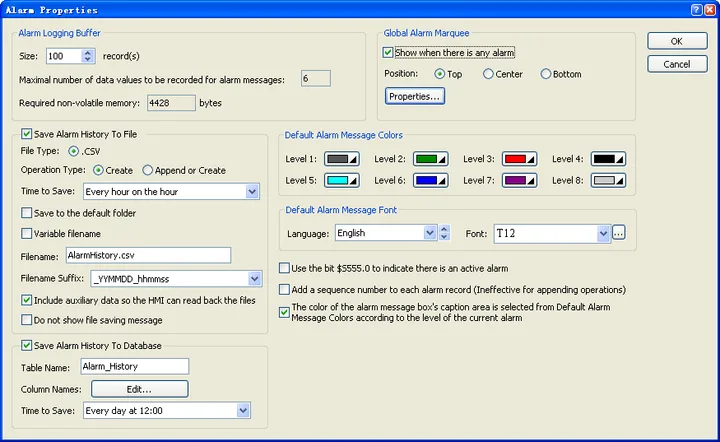
The table below describes each property in the Alarm Properties dialog.
|
Property |
Description | |||
|---|---|---|---|---|
| Alarm Logging Buffer | Size | The maximum number of records that the alarm logging buffer can hold. For example: 100 means that when the 101st alarm occurs, the 1st record will be overwritten. | ||
| Maximal number of data values to be recorded for alarm messages | Displays the maximal number of data values to be recorded. It can be set in the properties dialog box of discrete alarm block and analog alarm block. | |||
| Required non-volatile memory | The size of the alarm logging buffer. The unit is byte. The formula to calculate the size is: Alarm Logging Buffer Size = Number of Records * (20 + Maximal Number of Data Values to be recorded * 4) + 28. | |||
| Save Alarm History To File | Save Alarm History to file | Check this option so the most current alarm history record will be written to a specified file periodically. Each time the operation is performed, the panel writes only the record that has not already been saved to the file. | ||
| File Type | The type of file to save the alarm history. | |||
| File Type | Description | |||
| .CSV | The alarm history is saved in CSV format. You can use any text editor or Microsoft Excel to view the file. | |||
| .XLS | The alarm history is saved in XLS format. You can use Microsoft Excel to view the file. This type is available only when the target panel is the HMI Runtime. | |||
| Operation Type | Specifies how to open a file to save the logged data. | |||
| Operation Type | Description | |||
| Create | Creates a new file with the specified filename to save the alarm history. | |||
| Append or Create | If the specified file exists, appends the alarm history to that file; otherwise creates a new file with the specified filename to save the alarm history. | |||
| Time to Save | Specifies the period to save the alarm history records. This item is available when the option Save alarm history to file is checked. There are nine periods available: Every hour on the hour ; Every 8 hours (00:00, 08:00, 16:00) ; Every 12 hours (00:00, 12:00) Every day at 00:00; Every day at 08:00; Every day at 12:00; Every Sunday at 00:00; Every Monday at 00:00; Every month's first day at 00:00, Every minute (For test only), Every 5 minutes, Every 10 minutes, Every 15 minutes, Every 30 minutes. | |||
| Save to the default folder | Check the option to save the file in the default folder. Please see Section 3.1.4 for details about specifying default folder. | |||
| Variable filename | Check the option to specify the variable representing the filename to save the alarm records at runtime. | |||
| File Name | The filename or the prefix of the filename of the file to save the alarm record as. The filename must be a null terminated ASCII character string and follows the rule of Windows filenames. The alarm records are saved in text format and the file extension name must be same as the file type. You can use any text editor or Microsoft Excel to view the alarm records directly. This item is available when the option Save alarm history to file is checked. | |||
| File name Suffix | Available when the Operation Type is Create. This property guarantees that the created file has a unique name and no existing file will be overwritten. There are four kinds of filename suffixes available as shown in the following table. | |||
| Filename Suffix | Description | Example | ||
| _YYMMDD_hhmmss |
YY: year (00-99) MM: month (01-12) DD: day (01-31) hh: hour (00-23) mm: minute (00-59) ss: second (00-59) |
Log_090423_102358 (Assume that the specified Filename is "Log", the current date is April 23, 2009, and the current time is 10:23:58.) |
||
| _YYMMDD_hhmm | Log_090423_1023 | |||
| _YYMMDD_hh | Log_090423_10 | |||
| _YYMMDD | Log_090423 | |||
| Include auxiliary data so the HMI can read back the files | Check this option to include auxiliary data when saving the file. And the saved file can be read by HMI. Without the auxiliary data, the saved file is not readable by HMI. | |||
| Do not show file saving message | Check this option to hide the file saving message at runtime. | |||
| Save Alarm History to Database | Save Alarm History to Database | Check this option so the most current alarm history record will be written to a specified database periodically. Each time the operation is performed, the panel writes only the record that has not already been saved to the database. This item is available only when the target panel is the HMI Runtime.. | ||
| Table Name | Specifies a name as the table name in the database. | |||
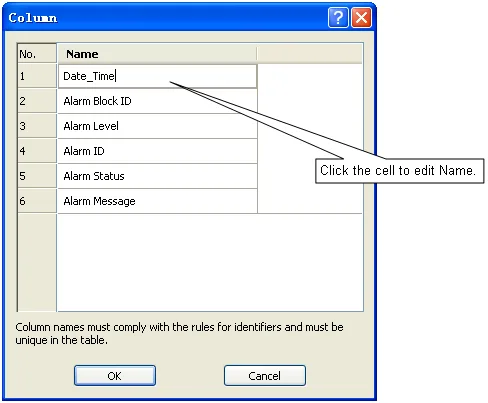
| Column Names |
Click the edit button to bring
up the following dialog box to
specify the column names. Note
that the name must comply with
the rules for database
identifiers
|
|||
| Time to Save | Specifies the period to save the alarm history records. This item is available when the option Save alarm history to database is checked. There are nine periods available: Every hour on the hour ; Every 8 hours (00:00, 08:00, 16:00) ; Every 12 hours (00:00, 12:00) Every day at 00:00; Every day at 08:00; Every day at 12:00; Every Sunday at 00:00; Every Monday at 00:00; Every month's first day at 00:00, Every minute (For test only), Every 5 minutes, Every 10 minutes, Every 15 minutes, Every 30 minutes. | |||
| Global Alarm Marquee | Show when there is any alarm | Check this option if you want to show the global alarm marquee on the current screen when there is any alarm. | ||
| Position | Select one of the following 3 positions for the global alarm marquee to be displayed. | |||
| Position | Description | |||
| Top |
The global alarm marquee shows
up at the top of the screen.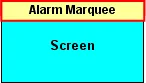 |
|||
| Center |
The global alarm marquee shows
up at the center of the screen.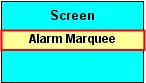 |
|||
| Bottom |
The global alarm marquee shows
up at the bottom of the screen.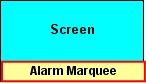 |
|||
| Properties | Click the button to bring up the Alarm Display dialog box to set up the properties of the global alarm marquee. Please see Section 12.6.4 for details. | |||
| Default Alarm Message Color |
Level 1, Level 2… Level 8 |
Select a default color for alarm levels 1, 2…8. The alarm display for each alarm level will show an alarm message with the selected color. | ||
| Default Alarm Message Font | Language | Select a default language so you can view and edit the language dependent settings in the Text group for that language. The language dependent properties in the Text group include Font and Alarm Status Abbreviation. | ||
| Font | Select a default font for the text of the alarm message. | |||
| Use the bit $S555.0 to indicate there is an active alarm | The system bit $S555.0 can be used to indicate there is an active alarm. When the bit is On, it indicates there is at least one active alarm. When the bit is Off, it indicates there is no active alarm. | |||
| Add a sequence number to each alarm record (Ineffective for appending operations) | Check this option to add a sequence number to each alarm record. | |||
| The color of the alarm message box's caption area is selected from Default Alarm Message Colors according to the level of the current alarm |
Check this option to make the
color of the caption area of the
alarm message box associated
with the level of the alarm that
it displays.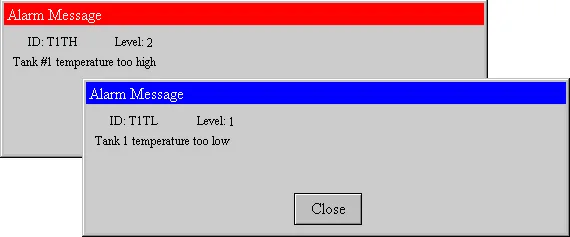 |
|||
Need PM Designer itself?
V4 for current PK, PT, ITV and PM panels, V2 for older models. Free, sent by email.
Source.Section 12.2 of the PM Designer Software User Manual, Edition 2.0, © Cermate Technologies Inc. (www.cermate.com, service@cermate.com). Reproduced online, with the manual's own figures, by TSL Automation Solutions, authorised Cermate distributor, for users of Cermate HMI panels. PM Designer and PanelMaster are trademarks of Cermate Technologies Inc.
Text and figures are the manufacturer's and may describe features your panel or software version does not have. For a plain-language introduction read the PM Designer guide; for help with a specific panel contact TSL Automation.