
Section 12.6.4 · Chapter 12: Alarms and Alarm Displays
Alarm Display - General Settings
This section describes how to define the general settings for an alarm display. The following is an example of the General page of the Alarm Display dialog box.
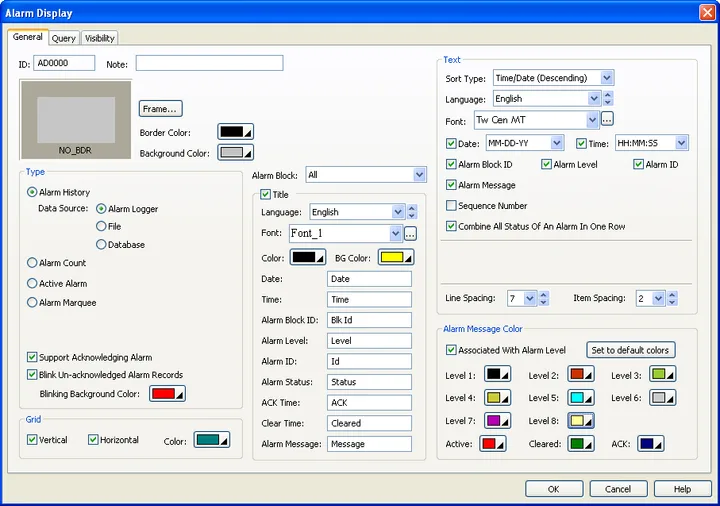
The following table describes each property in the General page of the Alarm Display dialog box.
|
Property |
Description | |||
|---|---|---|---|---|
| ID | The object’s identifier. It is generated when the object is created. The identifier is unique within the screen where the object is located and is unchangeable. The format of the IDs for the alarm displays is ADnnnn. | |||
| Note | You can type a note for the object. | |||
| Shape settings |
For details about the following
properties, see
Section
4.3.4 Setting up the Shape of an
Object.
 ,
Border Color, BG Color |
|||
| Type | Specifies the type of the alarm display. There are four types: | |||
| Type | Description | |||
| Alarm History | The alarm history display lists the alarm records. | |||
| Alarm Count | The alarm count display lists the number of occurrences of each alarm. | |||
| Active Alarm | The active alarm display lists the active alarms. | |||
| Alarm Marquee | The alarm marquee scrolls the messages of the active alarms horizontally. | |||
| Data Source |
Select alarm logger or file as
the source of the collected data
when the type is alarm history.
If the target panel is HMI
runtime, you can select database
as the source of the collected
data. When "alarm Logger" is selected as the data source for such objects, that object displays the sampled data stored in the logging buffer of the associated alarm block. When "File" is selected as the data source for such objects, that object displays the sampled data stored in the specified file buffer. One HMI can have up to 16 file buffers and each file buffer is identified by a unique number between 0 and 15. You can create a function button to load the sampled data stored in a file. 1) Select "Load Logged Alarms From File" as the operation of that function button. 2) Select the file extension type. Both CSV and TXT are supported. 3) Specify the file buffer to save the loaded data. 4) Specify the size of the file buffer. The size is the maximum number of samples that the file buffer can hold. |
|||
| File Buffer ID | Specify the File Buffer ID if the data source is a file. To specify a file buffer ID for a file, you can use the Load Logged Alarms From File operation of the function button. Please see Section 5.4 Performing Built-in Function Using Function Buttons for details. | |||
| Scrolling Speed | Select a speed for the alarm display when the Type is Alarm Marquee. | |||
| Direction | Select Leftward or Rightward for the alarm display when the Type is Alarm Marquee. | |||
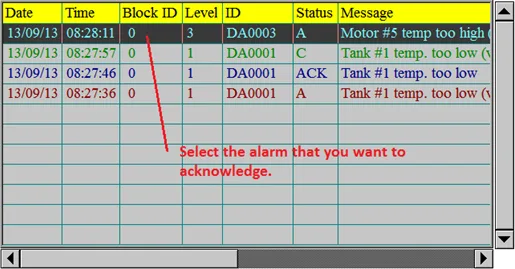
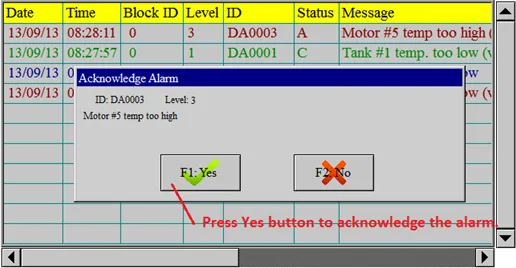
| Support Acknowledging Alarm |
Check the option to acknowledge
individual alarm at run time. At run time, select the alarm you want to acknowledge by touching the row of that alarm on the alarm history display. Note that you cannot select an alarm that is already acknowledged or there exists a newer record of the same alarm. The Acknowledge Alarm message box appears after an alarm is selected. Press Yes button to acknowledge the alarm or press No button to close the message box.
|
|||
| Blink Un-acknowledged Alarm Records | Check this option if you want to make un-acknowledged alarm records blink at run time. | |||
| Blinking Background Color | Select a color as the blinking background | |||
| Grid | Vertical | Select this option if you want the alarm display to have vertical grids. | ||
| Horizontal | Select this option if you want the alarm display to have horizontal grids. | |||
| Color | Select a color for the grids. | |||
| Alarm Block | Select an alarm block so that the alarm display will show the alarms defined in that alarm block only. Select All if you want the alarm display to show all the alarms. | |||
| Title | <Check Box> | Select this option if you want the alarm display to have a title row to show the title for each column of the displayed list when the Type is Alarm History, Alarm Count, or Current Alarm. | ||
| Language | Select a language so you can view and edit the settings of the title row for that language. | |||
| Font | Select a font for the title text. | |||
| Color | Select a color for the text. | |||
| BG Color | Select a color for the title row. | |||
| Date | Specifies the title for the Date column. This field is available when the Type is Alarm History or Current Alarm. | |||
| Time | Specifies the title for the Time column. This field is available when the Type is Alarm History or Current Alarm. | |||
| Alarm Block ID | Specifies the title for the Alarm Block ID column. | |||
| Alarm Level | Specifies the title for the Alarm Level column. | |||
| Alarm ID | Specifies the title for the Alarm ID column. | |||
| Alarm Status | Specifies the title for the Alarm Status column. This field is available when the Type is Alarm History. | |||
| Alarm Count | Specifies the title for the Alarm Count column. This field is available when the Type is Alarm Count. | |||
| ACK Time | Specifies the title for the ACK Time column. This field is available when the option Combine All Status of An Alarm in One Row is checked. | |||
| Clear Time | Specifies the title for the Clear Time column. This field is available when the option Combine All Status of An Alarm in One Row is checked. | |||
| Alarm Message | Specifies the title for the Alarm Message column. | |||
| Text | Sort Type |
Specifies how the alarm display
initially sorts its list. This
field is available when the Type
is not Alarm Marquee. Note: When you want an alarm display to sort its list by the contents of a column at runtime, simply touch the title of that column and the alarm display will sort its list right away. |
||
| Language | Select a language so you can view and edit the language dependent settings in the Text group for that language. The language dependent properties in the Text group include Font and Alarm Status Abbreviation. | |||
| Font | Select a font for the text. | |||
| Date | <Check Box> | Check this option if you want the alarm display to have the Date column. This field is available when the Type is Alarm History. | ||
| <Drop-down List> | Select a format for displaying the date | |||
| Time | <Check Box> | Check this option if you want the alarm display to have the Time column. This field is available when the Type is Alarm History. | ||
| <Drop-down List> | Select a format for displaying the time | |||
| Alarm Block ID | Check this option if you want the alarm display to have the Alarm Block ID column. | |||
| Alarm Level | Check this option if you want the alarm display to have the Alarm Level column. | |||
| Alarm ID | Check this option if you want the alarm display to have the Alarm ID column. | |||
| Alarm Message | Check this option if you want the alarm display to have the Alarm Message column. | |||
| Cleared Alarms | Check this option so the alarm display will show the records of cleared alarms. This field is available when the Type is Alarm History. | |||
| Alarm ACK | Check this option so the alarm display will show the records of acknowledged alarms. This field is available when the Type is Alarm History. | |||
| Sequence Number | Check this option so the alarm display will show the sequence numbers of the alarm records. This field is available when the Type is Alarm History. | |||
| Combine All Status of An Alarm in One Row | Check this option so the alarm display will show an alarm in one row by changing the specified alarm message color upon the different status. | |||
| Alarm Status Abbreviation | Active | Enter up to 3 characters that will be shown in the Alarm Status column for the alarm records that record when an alarm occurs. This field is available when the Type is Alarm History. | ||
| Cleared | Enter up to 3 characters that will be shown in the Alarm Status column for the alarm records that record when an alarm is cleared. This field is available when the Type is Alarm History. | |||
| ACK | Enter up to 3 characters that will be shown in the Alarm Status column for the alarm records that record when an alarm is acknowledged. This field is available when the Type is Alarm History. | |||
| Line Spacing | Specifies the extra space in pixels for two adjacent rows of the alarm display. This field is available when the Type is not Alarm Marquee. | |||
| Item Spacing | Specifies the extra space for every column of the alarm display. This field is available when the Type is not Alarm Marquee. | |||
| Alarm Message Color | Associated With Alarm Level | Check this option if you want to make alarm message color associated with alarm level. | ||
 |
Click the button to replace the selections of the L1 to L8 fields by the default alarm message colors defined in the Alarm Properties dialog box. This button is available when the Type is not Alarm History. | |||
| Level 1,Level 2 … Level 8 | Select a color for alarm level 1, 2…8. The alarm display will show an alarm message with this color if that alarm is defined as a level 1, 2…8 alarm. This field is available when the Type is not Alarm History. | |||
| Active | Select a color for displaying the alarm records that record when an alarm occurs. This field is available when the Type is Alarm History. | |||
| Cleared | Select a color for displaying the alarm records that record when an alarm is cleared. This field is available when the Type is Alarm History. | |||
| ACK | Select a color for displaying the alarm records that record when an alarm is acknowledged. This field is available when the Type is Alarm History. | |||
Need PM Designer itself?
V4 for current PK, PT, ITV and PM panels, V2 for older models. Free, sent by email.
Source.Section 12.6.4 of the PM Designer Software User Manual, Edition 2.0, © Cermate Technologies Inc. (www.cermate.com, service@cermate.com). Reproduced online, with the manual's own figures, by TSL Automation Solutions, authorised Cermate distributor, for users of Cermate HMI panels. PM Designer and PanelMaster are trademarks of Cermate Technologies Inc.
Text and figures are the manufacturer's and may describe features your panel or software version does not have. For a plain-language introduction read the PM Designer guide; for help with a specific panel contact TSL Automation.