
Section 5.2.2 · Chapter 5: Buttons and Switches
Toggle Switch - General Settings
This section describes how to define the general settings for a toggle switch.
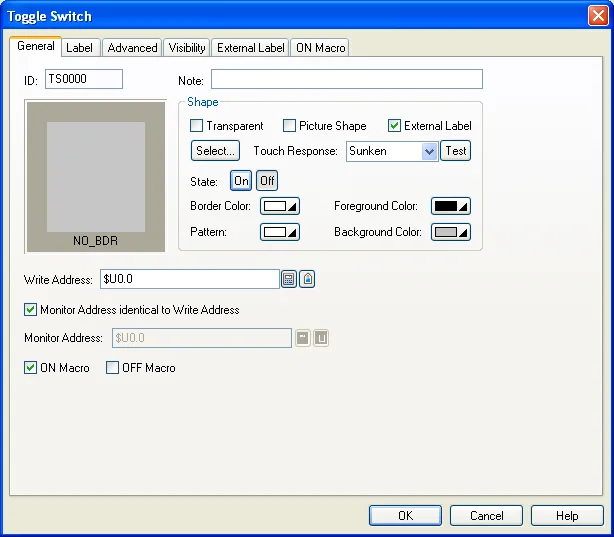
The above is an example of the General page of the Toggle Switch property sheet.
The following table describes each property in the General page.
|
Property |
Description | |
|---|---|---|
| ID | The object’s identifier. It is generated when the object is created. The identifier is unique within the screen where the object is located. The format of the IDs for toggle switches is TSnnnn. | |
| Note | You can type a note for the object. | |
| Shape settings |
For details about the following properties, see
Section 4.3.4 Setting up the Shape of an Object.
Transparent, Picture Shape,
 ,
Touch Response,  ,
Border Color, Pattern, Foreground Color, Background Color. |
|
| External Label | Check this option if you want the bit button to have an external label. Set up the external label in the External Label page. | |
 |
Click this button to change the object state to 1 (On) so you can view and set the object appearance for state 1 (On). | |
 |
Click this button to change the object state to 0 (Off) so you can view and set the object appearance for state 0 (Off). | |
| Write Address | Write Address | Specifies the bit variable or a word's bit variable to be operated. |
 |
Click this icon to bring up the Address Input Keypad and specify the desired address for the Write Address field. | |
 |
Click this icon to bring up the Select Tag dialog box and select the desired tag for the Write Address field. | |
| Monitor Address identical to Write Address | Specifies that the Monitor Address is identical to the Write Address. With this item checked, you don’t need to specify the Monitor Address again. This item is available when the Monitor option is checked. | |
| Monitor Address | Monitor Address | Specifies the bit variable or a word's bit variable to be monitored. |
|
|
Click this icon to bring up the Address Input Keypad and specify the desired address for the Monitor Address field. | |
|
|
Click this icon to bring up the Select Tag dialog box and select the desired tag for the Monitor Address field. | |
| ON Macro | Check this option if you want the button to have an ON macro. Specify and edit the ON macro in the ON Macro page. | |
| OFF Macro | Check this option if you want the button to have an OFF macro. Specify and edit the OFF macro in the OFF Macro page. | |
| Key | The hard key that is used to operate the bit button. This item is available only when the target panel has hard keys. | |
| Touch Operable | Check this option if you want the button is still operable by using the touch panel even it is configured to be operated by the key. | |
Need PM Designer itself?
V4 for current PK, PT, ITV and PM panels, V2 for older models. Free, sent by email.
Source.Section 5.2.2 of the PM Designer Software User Manual, Edition 2.0, © Cermate Technologies Inc. (www.cermate.com, service@cermate.com). Reproduced online, with the manual's own figures, by TSL Automation Solutions, authorised Cermate distributor, for users of Cermate HMI panels. PM Designer and PanelMaster are trademarks of Cermate Technologies Inc.
Text and figures are the manufacturer's and may describe features your panel or software version does not have. For a plain-language introduction read the PM Designer guide; for help with a specific panel contact TSL Automation.