
Section 7.1.4 · Chapter 7: Displaying and Inputting Data
Advanced Settings for Numeric Entries
This section describes how to define the advanced settings for numeric entries. The following is an example of the Advanced page of the Numeric Entry property sheet.
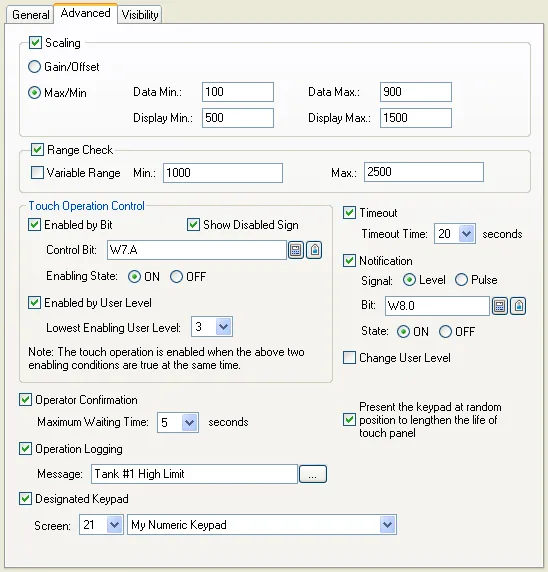
The following table describes each property in the Advanced page.
|
Property |
Description | ||
|---|---|---|---|
| Scaling | Scaling | Check this option if you want the displayed/output value not same as the original (monitored/entered value) but in a specified scaled version. | |
| Gain/Offset |
Set the Gain and Offset of the scaling formula. If this option is selected, the monitored value will be scaled by the following formula with specified gain and offset. DisplayedValue = MonitoredValue * Gain + Offset And the entered value will be scaled by the following formula with the same coefficients (Gain and Offset) before it is output. OutputValue = (EnteredValue – Offset) / Gain Note: The Gain and Offset are 32-bit floating point numbers. They have, at most, 6 significant digits. Rounding and truncation errors may occur. |
||
| Max/Min |
Set the minimal and maximal values of
the data and their corresponding display values If this option is selected, the value of the monitored variable will be scaled to fit the display range before displayed. And the entered value will be scaled to fit the data range before it is output. |
||
| Range Check | Range Check |
Check this option if you want numeric entry to verify an
entered value according to the specified minimum and
maximum. If the entered value is not within the
allowable range, the entered value will not be output. Note 1: When the scaling option is selected, the output value is verified instead of the entered value. OutputValue = (EnteredValue – Offset) / Gain Note 2: When the scaling option is selected, the allowable maximum and minimum shown on the keypad are the scaled versions of the specified maximum and minimum. ScaledMaximum = Maximum * Gain + Offset ScaledMinimum = Minimum * Gain + Offset |
|
| Variable Range | Check this option if the minimum and maximum are specified by the designated variables at runtime. | ||
| Min. |
Specifies the minimum when the Variable Range is not
selected. When the Variable Range is selected, this property specifies the variable that stores the minimum at runtime. Click  to enter an address. Click  to select a tag. |
||
| Max. |
Specifies the maximum when the Variable Range is not
selected. When the Variable Range is selected, this property specifies the variable that stores the maximum at runtime. Click
to enter an address. Click
to select a tag. |
||
| Touch Operation Control | Enabled by Bit | Check this option so the touch operation of numeric entry will be enabled and disabled by the specified bit. | |
| Control Bit |
Specifies the bit that enables and disables the touch
operation. Click
to enter a bit address. Click
to select a bit tag. |
||
| Enabling State | Specifies the state (On or Off) that enables the touch operation. | ||
| Enabled by User Level | Check this item so the touch operation of numeric entry will be enabled and disabled by the current user level. | ||
| Lowest Enabling User Level | Specifies the lowest user level that is required to enable the touch operation. | ||
| Show Disabled Sign | Check this option so the touch operation disabled sign will be shown on numeric entry when the touch operation is disabled. | ||
| Timeout | Timeout | Check this option so data entry will be cancelled if the numeric keypad does not receive any input within the specified time. | |
| Timeout Time | Specifies the maximum time that the numeric keypad will wait to receive a new input. If there is no input within the specified time, the numeric keypad will be closed and data entry will be cancelled. | ||
| Notification | Notification | Check this option so numeric entry will notify the specified bit after it finishes outputting the entered value to the destination variable. | |
| Signal |
Select one of the following signals for the
notification: |
||
| Signal | Description | ||
| Level | Set a specified bit to the specified state. | ||
| Pulse | Send a positive pulse to the specified bit. | ||
| Bit | Specifies the bit that receives the notification. | ||
| State | Specifies the state (On or Off) that is used for the notification. | ||
| Operator Confirmation |
Operator Confirmation |
Check this option if you want the operator to confirm what he/she enters for the numeric entry. The Confirmation box will be displayed when a value is entered for numeric entry. If the operator selects “Yes” in the Confirmation box, numeric entry will write the entered value to the specified variable. If the operator selects “No” or the operator does not respond within the specified time period (Maximum Waiting Time), numeric entry will cancel the data entry operation. | |
| Maximum Waiting Time | Specifies the maximum time that numeric entry will wait for the operator’s confirmation. Data entry will be cancelled if the operator does not respond within this time. | ||
| Change User Level | Change User Level | Check this option if you want to change the current user level after the operation is performed. | |
| New User Level | Set the new current user level. | ||
| Operation Logging | Operation Logging |
Check this option so the following three items will be
recorded in the operation log when numeric entry outputs
the entered value. There are three recorded items: 1) The time when the operation is performed 2) The entered value 3) The predefined operation message |
|
| Message | Enter the operation message of the first language. | ||
 |
Click this button to bring up the Operation Message dialog box so that you can edit the operation message for all the languages. | ||
| Present the keypad at random position to lengthen the life of touch panel | Check this option if you want the keypad displayed at the random position. | ||
| Designated Keypad | Designated Keypad | Check this option if you want the numeric entry to have an independent keypad other than the system keypad or the customized keypad used for whole panel application. | |
| Screen | Select a window screen as the keypad. | ||
Need PM Designer itself?
V4 for current PK, PT, ITV and PM panels, V2 for older models. Free, sent by email.
Source.Section 7.1.4 of the PM Designer Software User Manual, Edition 2.0, © Cermate Technologies Inc. (www.cermate.com, service@cermate.com). Reproduced online, with the manual's own figures, by TSL Automation Solutions, authorised Cermate distributor, for users of Cermate HMI panels. PM Designer and PanelMaster are trademarks of Cermate Technologies Inc.
Text and figures are the manufacturer's and may describe features your panel or software version does not have. For a plain-language introduction read the PM Designer guide; for help with a specific panel contact TSL Automation.