
Section 7.4.3 · Chapter 7: Displaying and Inputting Data
Character Entry - General Settings
This section describes how to define the general settings for character entries. The following is an example of the General page of the Character Entry property sheet.
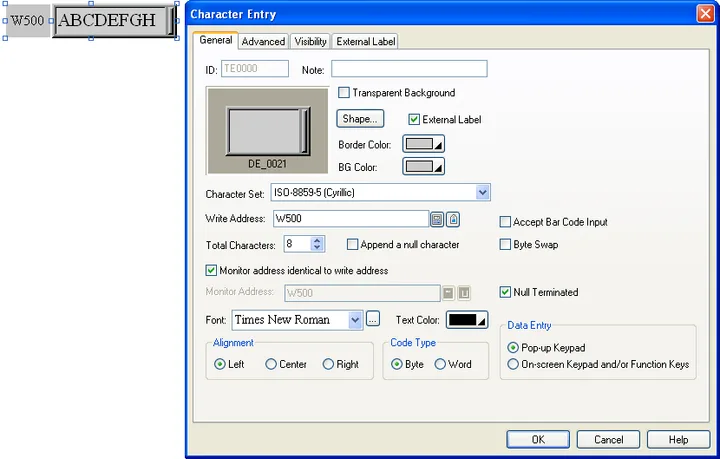
The following table describes each property in the General page.
|
Property |
Description | ||
|---|---|---|---|
| ID | The object’s identifier. It is generated when the object is created. The identifier is unique within the screen where the object is located. The format of the IDs for Character entries is TEnnnn. | ||
| Note | You can type a note for the object. | ||
| Transparent Background | Select this option if you want the object to have a transparent background. | ||
| Shape settings |
For details about the following properties,
see Section 4.3.4 Setting up the
Shape of an Object.
 ,
Border Color, BG Color |
||
| External Label | Check this option if you want the object to have an external label. Set up the external label in the External Label page. | ||
| Character Set | Select one of the following five character sets to encode characters into a string of code units. | ||
| Character Set | Description | ||
| ASCII (US) | Defines 128 characters. Uses 8 or 16 bits per character. | ||
| ISO-8859-1 (Western European) | Covers mostly Western European languages. Uses 8 or 16 bits per character. | ||
| ISO-8859-5 (Cyrillic) | Covers languages using a Cyrillic alphabet such as Bulgarian, Belarusian, Russian, Serbian and Macedonian. Uses 8 or 16 bits per character. | ||
| Unicode | Available only when the target panel is the HMI Runtime. Each character occupies one word and the code is Unicode. | ||
| Unicode (Chinese Class 1 & 2, PRC ) | Covers mostly Simplified Chinese characters for use in mainland China. Each character occupies one word and the code is Unicode. | ||
| Write Address |
Specifies the destination variable where the entered
character string will be written to. Click  to enter an address for this field. Click  to select a tag for this field. |
||
| Total Characters | Specifies the number of characters that the Character entry can display and the destination variable can receive. | ||
| Append a null character | Check this option so the Character entry will always append a null character to the entered character string before outputting it. | ||
| Accept Bar Code Input | Check this option so the bar code input from the bar code reader connected to the specified USB port will be displayed on the character keypad. | ||
| Byte Swap | Check this option to display high byte first and then low byte. | ||
| Monitor Address identical to Write Address | Specifies that the monitored variable is the same as the destination variable. With this item checked, you don’t need to specify the monitored variable in the Monitor Address field. | ||
| Monitor Address |
Specifies the monitored variable. Click
to enter an address for this field. Click
to select a tag for this field. |
||
| Null Terminated |
When Null Terminated is not selected, the object will
display all the characters in the associated memory up
to the specified length. For the character of code 0,
the object will display a space instead.
When Null Terminated is selected, the object will display all the characters in the associated memory up to the specified length if there is no character of code 0. If there is a character of code 0, the object will not display the character of code 0 and the remaining characters after it. |
||
| Font |
The font of the displayed string. You can use the
drop-down list to select a font, or click
 to bring up the Font Templates dialog box and select a
font for the current displayed string. You can change the font templates before
selecting a font in that dialog box. |
||
| Text Color | The color of the displayed string. | ||
| Alignment | The alignment of the displayed value. There are three types of alignment: Left, Center, and Right. | ||
| Code Type |
Select one of the following two code types. |
||
| Type | Description | ||
| Byte | Each character occupies one byte. | ||
| Word | Each character occupies one word. | ||
| Available only when the character set is ASCII (US) or ISO-8859-1 (Western European) or ISO-8859-5 (Cyrillic). | |||
| Data Entry |
Specifies how to enter a character string for the
Character entry at runtime. There are two options: |
||
| Option | Description | ||
| Pop-up Keypad | You can bring up the keypad by pressing the Character entry, and then enter a character string with the keypad. | ||
| On-screen Keypad and/or Function Keys | You can move the cursor by using the function buttons with the operation of “Select Next Data Entry Object” or “Select Previous Data Entry Object” to select the Character entry. If there is an on-screen keypad, you can enter a character string for the Character entry with that keypad. | ||
| Note: When the On-screen Keypad and/or Function Keys option is selected, you can only enter a character string for the Character entry with the input focus. To set the input focus to the corresponding object, you need to click that object first. | |||
Need PM Designer itself?
V4 for current PK, PT, ITV and PM panels, V2 for older models. Free, sent by email.
Source.Section 7.4.3 of the PM Designer Software User Manual, Edition 2.0, © Cermate Technologies Inc. (www.cermate.com, service@cermate.com). Reproduced online, with the manual's own figures, by TSL Automation Solutions, authorised Cermate distributor, for users of Cermate HMI panels. PM Designer and PanelMaster are trademarks of Cermate Technologies Inc.
Text and figures are the manufacturer's and may describe features your panel or software version does not have. For a plain-language introduction read the PM Designer guide; for help with a specific panel contact TSL Automation.