
Section 7.3.5 · Chapter 7: Displaying and Inputting Data
Advanced Numeric Display - Range Settings
This section describes how to define the range settings for an advanced numeric display. The following is an example of the Range page of the Advanced Numeric Display property sheet.
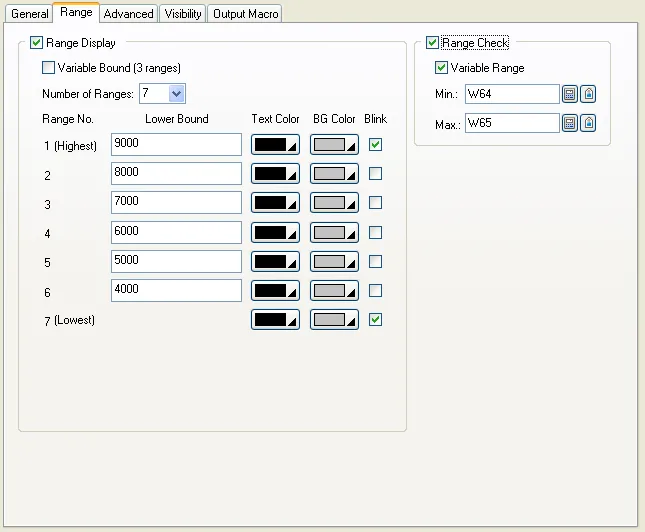
The following table describes each property in the Range page.
|
Property |
Description | ||
|---|---|---|---|
| Range Display | Range Display | Check this option if you want the advanced numeric display to support the range display. The advanced numeric display can support up to 10 fixed ranges or 3 variable ranges. You can define the text color, BG color, and lower bound for each range. At runtime, the monitored value within a range will be displayed with the color setting for that range. | |
|
Variable Bound (3 ranges) |
Check this option so the lower bounds of range 1 and
range 2 will be determined at runtime by the variables
specified in the Lower Bound fields for Range 1 and
Range 2. The advanced numeric display supports 3 ranges
when Variable Bound is selected. When Variable Bound is not selected, the advanced numeric display can support up to 10 ranges. You need to specify the lower bounds for every range except the lowest range. |
||
| Number of Ranges | The number of ranges that the advanced numeric display supports. | ||
|
Range 1(Highest) |
Lower Bound |
Specifies the lower bound of range 1 when Variable Bound
is not selected. When Variable Bound is selected, this property specifies the variable whose value will be the lower bound of range 1 at runtime. Click  to enter an address for this field. Click  to select a tag for this field. |
|
| Text Color | The text color for range 1. | ||
| BG Color | The shape’s BG color for range 1. | ||
| Blink | Check the item when you want range 1 to be displayed as blinking. | ||
| Range 2 | Lower Bound |
Specifies the lower bound of range 2 when Variable Bound
is not selected. When Variable Bound is selected, this property specifies the variable whose value will be the lower bound of range 2 at runtime. Click
to enter an address for this field. Click
to select a tag for this field. |
|
| Text Color | The text color for range 2. | ||
| BG Color | The shape’s BG color for range 2. | ||
| Blink | Check the item when you want range 2 to be displayed as blinking. | ||
| Range 3 to Range 10 | Lower Bound | Specifies the lower bound of the corresponding range when the range is not the lowest range. | |
| Text Color | The text color for the corresponding range. | ||
| BG Color | The shape’s BG color for the corresponding range. | ||
| Blink | Check the item when you want the corresponding range to be displayed as blinking. | ||
| Range Check | Range Check |
Check this option if you want the advanced numeric
display to verify the entered value according to the
specified minimum and maximum. If the entered value is
not within the allowable range, the entered value will
not be output. Note: If the output expression or the output macro is defined, the converted value stored in the variable $W is verified instead of the entered value. |
|
| Variable Range | Check this option so the minimum and maximum will be determined at runtime by the variables specified in the Minimum and Maximum fields. | ||
| Min. |
Specifies the minimum when the Variable Range is not
selected. When the Variable Range is selected, this property specifies the variable whose value is the minimum. Click
to enter an address for this field. Click
to select a tag for this field. |
||
| Max. |
Specifies the maximum when the Variable Range is not
selected. When the Variable Range is selected, this property specifies the variable whose value is the maximum. Click
to enter an address for this field. Click
to select a tag for this field. |
||
Need PM Designer itself?
V4 for current PK, PT, ITV and PM panels, V2 for older models. Free, sent by email.
Source.Section 7.3.5 of the PM Designer Software User Manual, Edition 2.0, © Cermate Technologies Inc. (www.cermate.com, service@cermate.com). Reproduced online, with the manual's own figures, by TSL Automation Solutions, authorised Cermate distributor, for users of Cermate HMI panels. PM Designer and PanelMaster are trademarks of Cermate Technologies Inc.
Text and figures are the manufacturer's and may describe features your panel or software version does not have. For a plain-language introduction read the PM Designer guide; for help with a specific panel contact TSL Automation.