
Section 7.1.3 · Chapter 7: Displaying and Inputting Data
Numeric Entry - General Settings
This section describes how to define the general settings for a numeric entry. The following is an example of the General page of the Numeric Entry property sheet.
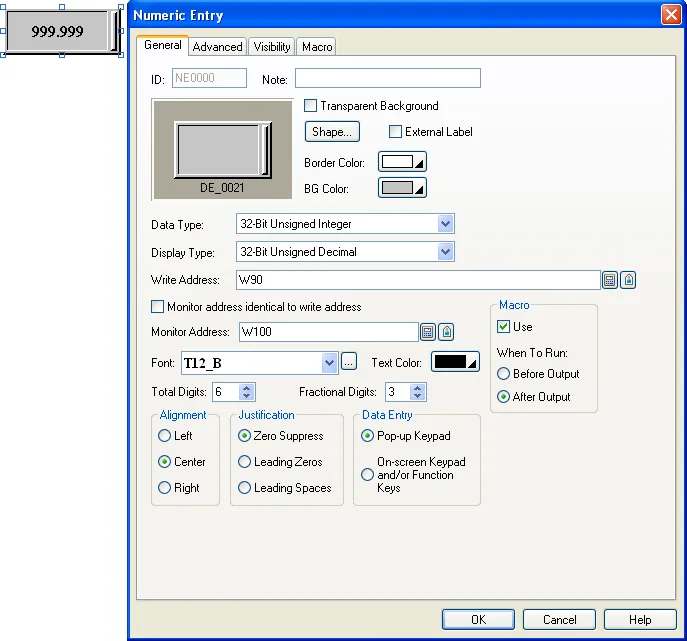
The following table describes each property in the General page.
|
Property |
Description | ||||||||||||||||||||||||||||||||||||||||||||||||||||||||||||||
|---|---|---|---|---|---|---|---|---|---|---|---|---|---|---|---|---|---|---|---|---|---|---|---|---|---|---|---|---|---|---|---|---|---|---|---|---|---|---|---|---|---|---|---|---|---|---|---|---|---|---|---|---|---|---|---|---|---|---|---|---|---|---|---|
| ID | The object’s identifier. It is generated when the object is created. The identifier is unique within the screen where the object is located. The format of the IDs for the numeric entries is NEnnnn. | ||||||||||||||||||||||||||||||||||||||||||||||||||||||||||||||
| Note | You can type a note for the object. | ||||||||||||||||||||||||||||||||||||||||||||||||||||||||||||||
| Transparent Background | Select this option if you want the object to have a transparent background. | ||||||||||||||||||||||||||||||||||||||||||||||||||||||||||||||
| Shape settings |
For details about the following properties, see
Section 4.3.4 Setting up the Shape
of an Object.
 ,
Border Color, BG Color. |
||||||||||||||||||||||||||||||||||||||||||||||||||||||||||||||
| External Label | Check this option if you want the object to have an external label. Set up the external label in the External Label page. | ||||||||||||||||||||||||||||||||||||||||||||||||||||||||||||||
| Data Type | The data type of the destination variable and the monitored variable. The supported data types include: 16-Bit Unsigned Integer, 32-Bit Unsigned Integer, 16-Bit Signed Integer, 32-Bit Signed Integer, 16-Bit BCD, 32-Bit BCD, 32-Bit Floating Point, 16-Bit Signed BCD (LMB), 32-Bit Signed BCD (LMB), 16-Bit Signed BCD (LMD), 32-Bit Signed BCD (LMD), 8-Bit Unsigned Integer and 8-bit Signed Integer. | ||||||||||||||||||||||||||||||||||||||||||||||||||||||||||||||
| Display Type | The display type of the value of the monitored variable. The following table shows the available display types for each data type. | ||||||||||||||||||||||||||||||||||||||||||||||||||||||||||||||
| Data Type | Available Display Types | ||||||||||||||||||||||||||||||||||||||||||||||||||||||||||||||
| 16-Bit Unsigned Integer | 16-Bit Unsigned Decimal, 16-Bit Hexadecimal, 16-Bit Octal,16-Bit Binary | ||||||||||||||||||||||||||||||||||||||||||||||||||||||||||||||
| 32-Bit Unsigned Integer | 32-Bit Unsigned Decimal, 32-Bit Hexadecimal, 32-Bit Octal, 32-Bit Binary, Password, IP Address | ||||||||||||||||||||||||||||||||||||||||||||||||||||||||||||||
| 16-Bit Signed Integer | 16-Bit Signed Decimal | ||||||||||||||||||||||||||||||||||||||||||||||||||||||||||||||
| 32-Bit Signed Integer | 32-Bit Signed Decimal | ||||||||||||||||||||||||||||||||||||||||||||||||||||||||||||||
| 16-Bit BCD | 16-Bit Unsigned Decimal | ||||||||||||||||||||||||||||||||||||||||||||||||||||||||||||||
| 32-Bit BCD | 32-Bit Unsigned Decimal | ||||||||||||||||||||||||||||||||||||||||||||||||||||||||||||||
| 32-Bit Floating Point | 32-Bit Floating Point, Exponential Format (eg.: -1.2345e+20) | ||||||||||||||||||||||||||||||||||||||||||||||||||||||||||||||
| 16-Bit Signed BCD (LMB) | 16-Bit Signed Decimal | ||||||||||||||||||||||||||||||||||||||||||||||||||||||||||||||
| 32-Bit Signed BCD (LMB) | 32-Bit Signed Decimal | ||||||||||||||||||||||||||||||||||||||||||||||||||||||||||||||
| 16-Bit Signed BCD (LMD) | 16-Bit Signed Decimal | ||||||||||||||||||||||||||||||||||||||||||||||||||||||||||||||
| 32-Bit Signed BCD (LMD) | 32-Bit Signed Decimal | ||||||||||||||||||||||||||||||||||||||||||||||||||||||||||||||
| 8-Bit Unsigned Integer | 8-Bit Unsigned Decimal, 8-Bit Hexadecimal, 8-Bit Binary | ||||||||||||||||||||||||||||||||||||||||||||||||||||||||||||||
| 8-Bit Signed Integer | 8-Bit Signed Decimal | ||||||||||||||||||||||||||||||||||||||||||||||||||||||||||||||
|
Note: LMB: Stands for "Left Most Bit". If the left most bit of a value is "1", the value represents a negative value. LMD: Stands for "Left Most Digit". If the left most byte of a value is "F", the value represents a negative value. |
|||||||||||||||||||||||||||||||||||||||||||||||||||||||||||||||
| Separator | Check this option if you want the binary number to display with dot separator positioned in every four numbers. Available only when the display type is 8-Bit Binary,16-Bit Binary and 32-Bit Binary. eg.: 1111.1011.1000.0101 | ||||||||||||||||||||||||||||||||||||||||||||||||||||||||||||||
| Write Address |
Specifies the destination variable where the entered
value will be written. Click  to enter an address for this field. Click  to select a tag for this field. |
||||||||||||||||||||||||||||||||||||||||||||||||||||||||||||||
| Monitor Address identical to Write Address | Specifies that the monitored variable is the same as the destination variable. With this item checked, you don’t need to specify the monitored variable in the Monitor Address field. | ||||||||||||||||||||||||||||||||||||||||||||||||||||||||||||||
| Monitor Address |
Specifies the monitored variable. Click
to enter an address for this field. Click
to select a tag for this field. |
||||||||||||||||||||||||||||||||||||||||||||||||||||||||||||||
| Font |
The font of the displayed value. You can use the drop-down list to select a
font, or click  to bring up the Font Templates dialog box and select a
font for the current text. You can change the font templates before
selecting a font in that dialog box. |
||||||||||||||||||||||||||||||||||||||||||||||||||||||||||||||
| Text Color | The color of the displayed value. | ||||||||||||||||||||||||||||||||||||||||||||||||||||||||||||||
| Total Digits |
The number of digits to be displayed. Note: This property applies to the display of the initial value, the allowable minimum, and the allowable maximum on the numeric keypad. |
||||||||||||||||||||||||||||||||||||||||||||||||||||||||||||||
| Fractional Digits |
When the Display Type is 32-bit Floating Point, this
property specifies the number of fractional digits
displayed. When the Display Type is not 32-bit Floating Point, this property specifies not only the number of fractional digits displayed, but also the number of least significant digits displayed as the fractional part. With this feature, an integer can be shown and entered as a fixed point number. When the Fractional Digits is nonzero, say N, the entered value will be converted to an integer according to the following formula before being output. OutputValue = EnteredValue * (Nth power of 10) Example 1:
Example 2:
|
||||||||||||||||||||||||||||||||||||||||||||||||||||||||||||||
| Alignment | The alignment of the displayed value. There are three types of alignment: Left, Center, and Right. | ||||||||||||||||||||||||||||||||||||||||||||||||||||||||||||||
| Justification |
The justification of the displayed value. There are
three types of justification: |
||||||||||||||||||||||||||||||||||||||||||||||||||||||||||||||
| Option | Description | ||||||||||||||||||||||||||||||||||||||||||||||||||||||||||||||
| Zero Suppress | The leading digits will not be displayed when they are 0. | ||||||||||||||||||||||||||||||||||||||||||||||||||||||||||||||
| Leading Zeros | All digits will be displayed. | ||||||||||||||||||||||||||||||||||||||||||||||||||||||||||||||
| Leading Spaces | The leading digits will be displayed as a blank character when they are 0. | ||||||||||||||||||||||||||||||||||||||||||||||||||||||||||||||
| Data Entry | Specifies how to enter a value for the numeric entry at runtime. There are two options: | ||||||||||||||||||||||||||||||||||||||||||||||||||||||||||||||
| Option | Description | ||||||||||||||||||||||||||||||||||||||||||||||||||||||||||||||
| Pop-up Keypad | You can bring up the keypad by pressing numeric entry and then enter a value with the keypad. | ||||||||||||||||||||||||||||||||||||||||||||||||||||||||||||||
| On-screen Keypad and/or Function Keys | You can move the cursor by using the function buttons with the operation of “Select Next Data Entry Object” or “Select Previous Data Entry Object” to select numeric entry. If there is an on-screen keypad, you can enter a value for the numeric entry immediately. You can also use the function buttons with the operation of “Increase Value By One” or “Decrease Value By One” to change the value of the destination variable. | ||||||||||||||||||||||||||||||||||||||||||||||||||||||||||||||
| Note: When On-screen Keypad and/or Function Keys option is selected, you can only enter a value for the numeric entry with the input focus. To set the input focus on the corresponding object, you need to click the object first. | |||||||||||||||||||||||||||||||||||||||||||||||||||||||||||||||
| Macro | |||||||||||||||||||||||||||||||||||||||||||||||||||||||||||||||
| Use | Check this option if you want the numeric entry to have a macro. Specify and edit the macro in the Macro page. | ||||||||||||||||||||||||||||||||||||||||||||||||||||||||||||||
| When to Run | Select the time to run the macro. A macro can be run before or after the entered value is output. | ||||||||||||||||||||||||||||||||||||||||||||||||||||||||||||||
Need PM Designer itself?
V4 for current PK, PT, ITV and PM panels, V2 for older models. Free, sent by email.
Source.Section 7.1.3 of the PM Designer Software User Manual, Edition 2.0, © Cermate Technologies Inc. (www.cermate.com, service@cermate.com). Reproduced online, with the manual's own figures, by TSL Automation Solutions, authorised Cermate distributor, for users of Cermate HMI panels. PM Designer and PanelMaster are trademarks of Cermate Technologies Inc.
Text and figures are the manufacturer's and may describe features your panel or software version does not have. For a plain-language introduction read the PM Designer guide; for help with a specific panel contact TSL Automation.