
Chapter 8 of 13 · PM Designer guide
Recipes in PM Designer: recipe blocks, recipe tables and data transfer
A recipe in PM Designer is one row of a recipe block: a set of named data items such as speeds, temperatures and times for one product. The panel keeps the whole block in its own memory, the operator picks a recipe with a recipe selector or edits it in a recipe table, and a function button, command flag or macro writes the current recipe to the PLC or reads it back. Up to 16 recipe blocks, 65,535 recipes per block and 8,192 words per recipe are supported, and recipes move between PC, panel, USB stick and PLC as PRD or CSV files.
Applies to PM Designer V2.1 and V4.0Updated 11 Nov 2026Manual reference: Chapter 11, GET_RCP_BLK and SET_RCP_BLK note
How recipes are organised
Think of a recipe block as a spreadsheet stored on the panel (Section 11.1). Each row is a recipe, each column a data item with a name, data type, display format, scaling and range check. The block has an ID from 0 to 15, a size per recipe in words and a number of recipes; memory required is simply the product. The current recipe number of block m lives in the register $RNm, and word n of the current recipe is addressed as $Rm:n, so screen objects can show and edit the current recipe directly, just like any other address. A recipe can be indexed by number or by a name stored in a string data item.
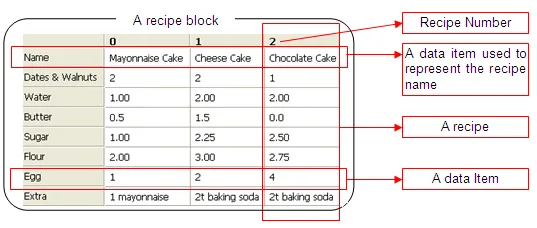
Setting up a recipe block
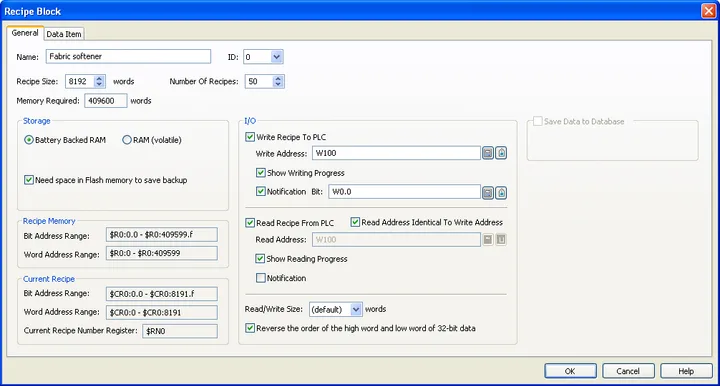
Right-click Recipes in the Project Manager and choose Add Recipe Block (Section 11.3). The General page (Section 11.5.1) asks for:
- Name, ID, Recipe Size, Number of Recipes, and the resulting Memory Required.
- Storage: battery-backed RAM, so recipes survive power off, or volatile RAM that is cleared at power-up (for recipes always loaded from a file or the PLC). Tick Need space in flash ROM to save backup to reserve a flash copy and name its file; the backup is written and restored by function buttons or the
RB2ROMandROM2RBmacro commands, and it is what rescues the recipes when the battery dies. - Write Recipe To PLC with a Write Address (the first word of the recipe area in the PLC), a Read/Write Size, a progress display and an optional notification bit that goes on when the write is done.
- Read Recipe From PLC with the matching read address and notification.
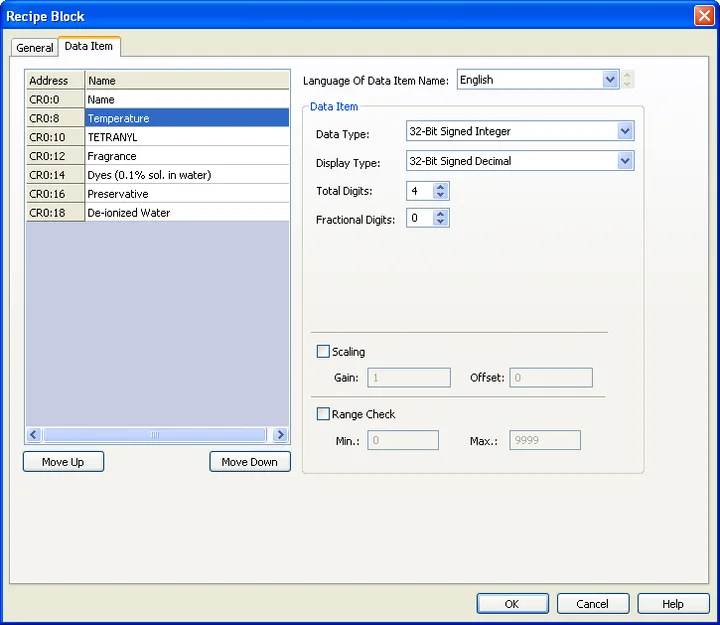
The Data Item page (Section 11.5.2) lists the items in order with their address inside the recipe. For each one choose the data type (16- and 32-bit integers, BCD, floating point, byte or word string), the display type and digits, scaling, and a minimum and maximum so an operator cannot enter a value the machine cannot run. Names are per language. One string item is normally reserved as the recipe name so selectors can show "Product A" rather than "3".
Recipe objects on the screen
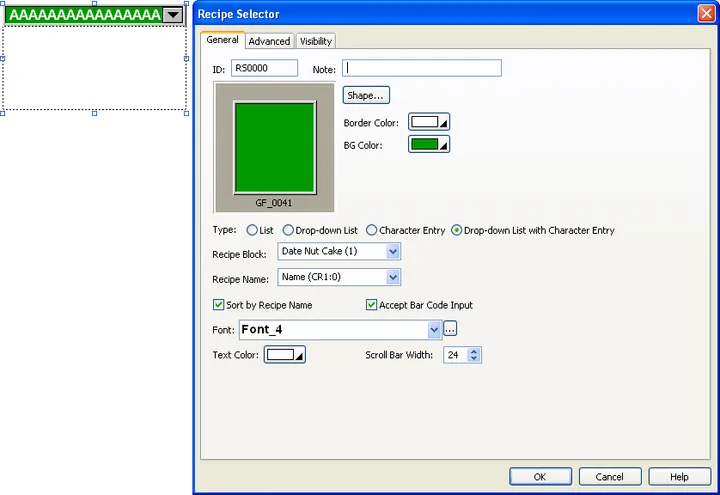
Recipe selector
A recipe selector (Section 11.6) changes $RNm. It can be a list, a drop-down list, a character entry where the operator types all or part of the name and the panel finds the first match, or a drop-down with character entry. Options include sorting by name and accepting a barcode scan as the selection, which is a neat way to load the right recipe from a works order label. Touch operation control, operation logging and visibility by bit or user level are on the Advanced and Visibility pages.
Recipe table
A recipe table (Section 11.7) shows the data items of the current recipe, or several recipes side by side, and lets the operator edit cells in place with the built-in keypads; the range check from the data item definition applies. Pair it with a selector and three function buttons (Write Recipe To PLC, Read Recipe From PLC, Save Recipe Data To File) and you have a complete recipe screen without a single macro.
Transferring recipes
| Between | How | Manual |
|---|---|---|
| Panel and PLC | Function button operations Write Recipe To PLC and Read Recipe From PLC; command flags Set Current Recipe Number (#2), Read Recipe From PLC (#3) and Write Recipe To PLC (#4) with the recipe number in Parameter One and the block in Parameter Two; the PLC can also write $RNm directly. | 11.4.4, 3.6 |
| Battery-backed RAM and flash | Function buttons or the macros RB2ROM (save) and ROM2RB (restore); the block must have the flash backup option ticked. | 11.4.3, 15.4.11 |
| Panel and USB stick or SD card | Function buttons Save Recipe Data To File and Load Recipe Data From File in PRD (binary) or CSV/TXT form, using the panel's Select File screen; or the general command with operation codes 4, 5 and 17. | 11.4.2, 3.6.7 |
| PC and panel | Data Transfer Helper: Get recipe data or Update recipe data over COM or Ethernet; or RecipeEditor to edit a PRD on the PC before sending it. | 11.4.1, 19.2, 19.4 |
| PM Designer projects | Export and Import recipe blocks as RBF files from the Recipes node. | 11.3 |
CSV recipe files can be prepared in Excel: one row per recipe, one column per data item in the block's order. The panel's RecipeEditor shows the same data row-wise or column-wise and saves PRD. When a block's layout changes (size or item order) old PRD files no longer match, so keep the CSV as the master and re-import.
Recipes on a client and server HMI (V4)
In a V4 client and server arrangement the recipe data on the client is not synchronised automatically. The application note on GET_RCP_BLK and SET_RCP_BLK explains the two macro commands that do it: call GET_RCP_BLK at start-up or before showing a recipe screen to fetch a block from the HMI server, and SET_RCP_BLK after editing to push the client's block back. Both report a completion percentage in a word you specify and may only be used in main, cycle and time macros.
A small macro example
// Load recipe 7 of block 0, send it to the PLC, then refresh the screen objects
$RN0 = 7 (U)
$U10 = RB2ROM(0)          // optional: keep a flash copy of the block first
REF_RCP_OBJ(0)            // redraw selectors and tables bound to block 0
Writing to the PLC itself is best left to the function button or command flag, which also drives the progress bar and notification bit. Use REF_RCP_OBJ whenever a macro changes recipe data behind the objects' backs, or the table keeps showing the old values until the operator touches it.
Frequently asked questions
Where are PM Designer recipes stored?
In the panel: in battery-backed RAM by default (so they survive power off), optionally with a backup copy in flash ROM. They can also be saved to PRD or CSV files on a USB stick or SD card and edited on a PC with RecipeEditor.
How does the operator choose a recipe?
With a Recipe Selector object, as a list, drop-down, typed name or barcode scan. Selecting a recipe writes its number to the current recipe number register $RN of that block.
How do I send a recipe to the PLC?
Enable Write Recipe To PLC in the recipe block with the PLC start address, then use a function button with the Write Recipe To PLC operation, or command flag #4 from the PLC. A notification bit can confirm completion.
Why did my recipes disappear?
Either the panel battery is flat (battery-backed RAM was cleared) or a download replaced them. Keep a flash backup with RB2ROM or the function button, tick Keep Previous Data > Recipe Data when downloading, and keep a CSV or PRD copy on file.
Can I edit recipes in Excel?
Yes. Export the block to CSV, edit it (one row per recipe, columns in data item order) and load it back with a function button or Data Transfer Helper.
Stuck on a Cermate panel?
TSL Automation has supplied and supported Cermate HMIs since 2015. Send us the model, the PM Designer version and a screenshot of the error.
Written by TSL Automation Solutions from the PM Designer user manual and application notes that ship with the software, and from our own support work. Screenshots are from the manual and remain the property of Cermate Technologies Inc. PM Designer and PanelMaster are trademarks of Cermate Technologies Inc. Check your panel's own manual for model-specific limits.