
Section 13.3.1 · Chapter 13: Data Collection and Historic Displays
Historic Trend Graph - Basic Operations
Follow the steps below to create a historic trend graph:
-
Click the Historic Trend Graph icon
 in the Object toolbar, or select Historic
Trend Graph in the Object sub-menu.
-
Move the cursor to the screen on which you want to create the object.
-
Click the desired position on the screen to place the new object.
You can use a Historic Trend Graph to display the values of the data collected by a data logger or a file as a trend graph.
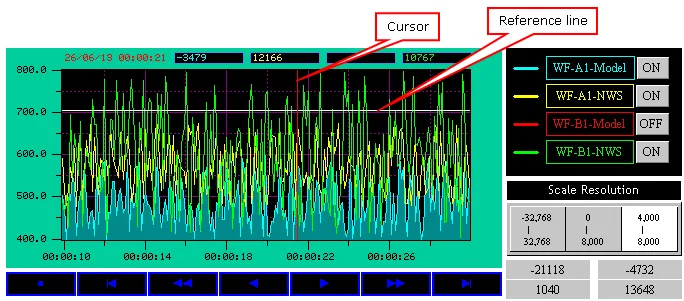
A historic trend graph can display up to 16 curves. The above is an example of the historic trend graph with four curves and one of them (curve in red) is hidden. The historic trend graph can have the following features:
1) A historic trend graph can provide a cursor for you to estimate the value in the desired time. The date, time, and data values of the selected time can be shown on the chart. Also, the data of the selected time can be written to a receiving buffer.
2) A historic trend graph can display one or two reference lines to help the operator to read the graph efficiently. A reference line can be a horizontal line for the "From Left To Right" trend graphs or a vertical line for the "From Top To Bottom" trend graphs. A reference line can also be a polyline for the trend graphs of any direction. You can control the position of a reference line at run time. If a reference line is a polyline, you can control its shape too.
3) The value scale of the historic trend graph can be changed at runtime.
4) Trend curves can be zoomed by varying time resolution.
5) Trend curves can be hidden dynamically.
Need PM Designer itself?
V4 for current PK, PT, ITV and PM panels, V2 for older models. Free, sent by email.
Source.Section 13.3.1 of the PM Designer Software User Manual, Edition 2.0, © Cermate Technologies Inc. (www.cermate.com, service@cermate.com). Reproduced online, with the manual's own figures, by TSL Automation Solutions, authorised Cermate distributor, for users of Cermate HMI panels. PM Designer and PanelMaster are trademarks of Cermate Technologies Inc.
Text and figures are the manufacturer's and may describe features your panel or software version does not have. For a plain-language introduction read the PM Designer guide; for help with a specific panel contact TSL Automation.