
Section 20.2.2 · Chapter 20: Setting up Target Panel
Panel Setup - General Settings
You may press the General button on the Panel Setup screen to bring up the General screen. The following is an example of the General screen:
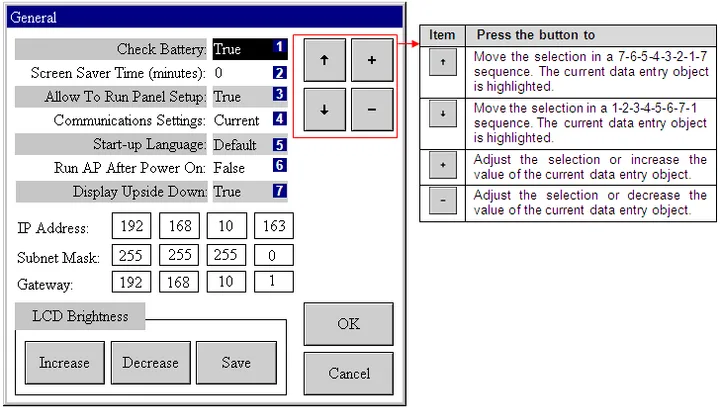
The following table describes each property on the General screen.
|
Property |
Description | |
|---|---|---|
| Check Battery |
Select True if you want the panel to check the battery
before running the application. If the battery check
failed, the “Battery backed RAM data error! All recorded
data are cleared!” error message will be displayed on
the screen. The default setting is True. |
|
| Screen Saver Time (minutes) | Enter a number between 0 and 60 to specify the time that the panel turns off the back light of the display when the panel has not been touched for the specified amount of time. The unit of time is minutes. This option lengthens the life of the CCFT back light. If you set “Screen saver time” to 0, the panel never turns off the back light. | |
| Allow To Run Panel Setup | Select True if you want to exit the running application and enter the panel setup mode. | |
| Communications Settings | When downloading an application, select Default to use the same communication parameters as those used when transmitting data. Select Current to use the communication parameters set in the target panel. To set up communication parameters, press the Link button on the Panel Setup screen. Please see Section 20.2.5 or Section 20.2.6 for details. | |
| Start-up Language | When downloading an application, select Default to use the same start-up language as what is used when transmitting data, or select 1 to 10 as the start-up language. | |
| Run AP After Power On | Select True if you want to run the application immediately after powering on. The default setting is False. | |
| Display Upside Down | Select True if you want to display the screen upside down. The default setting is False. | |
| IP Address | Press the edit field and bring up the Numeric keypad to input the IP address. Each IP byte can be a value between 0 and 255. | |
| Subnet Mask | Press the edit field and bring up the Numeric keypad to input the Subnet Mask. Each byte can be a value between 0 and 255. | |
| Gateway | Press the edit field and bring up the Numeric keypad to input the Gateway. Each byte can be a value between 0 and 255. | |
| LCD Brightness | Increase | Click it to increase the LCD brightness. |
| Decrease | Click it to decrease the LCD brightness. | |
| Save | Click it to save the current setting of the LCD brightness. | |
| OK | Click it to close the dialog box and accept all changes. | |
| Cancel | Click it to close the dialog box and discard all changes. | |
Need PM Designer itself?
V4 for current PK, PT, ITV and PM panels, V2 for older models. Free, sent by email.
Source.Section 20.2.2 of the PM Designer Software User Manual, Edition 2.0, © Cermate Technologies Inc. (www.cermate.com, service@cermate.com). Reproduced online, with the manual's own figures, by TSL Automation Solutions, authorised Cermate distributor, for users of Cermate HMI panels. PM Designer and PanelMaster are trademarks of Cermate Technologies Inc.
Text and figures are the manufacturer's and may describe features your panel or software version does not have. For a plain-language introduction read the PM Designer guide; for help with a specific panel contact TSL Automation.