
Section 20.2.4 · Chapter 20: Setting up Target Panel
Time and Date Settings
You may press the Set Time/Date button on the Panel Setup screen to bring up the Set Time and Date screen. The following is an example of the Set Time and Date screen.
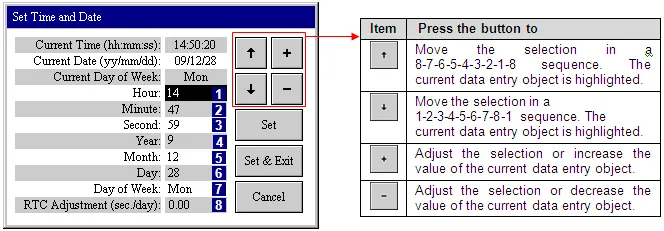
The following table describes each property on the General screen.
|
Property |
Description |
|---|---|
| Current Time (hh:m:ss) |
Displays the current time in the Real Time Clock chip. |
| Current Date (yy/mm/dd) | Displays the current date in the Real Time Clock chip. |
| Current Day of Week | Displays the current day of week in the Real Time Clock chip. |
| Hour | Select an integer value from 0 through 23 representing the hour of the day. |
| Minute | Select an integer value from 0 through 59 representing the minute. |
| Second | Select an integer value from 0 through 59 representing the second. |
| Year | Select an integer value from 0 through 99 representing the year. |
| Month | Select an integer value from 1 through 12 representing the month of the year. |
| Day | Select an integer value from 1 through 31 representing the day of the month. |
| Day of Week | Select Mon, Tue, Wed, Thu, Fri, Sat or Sun representing the day of the week. |
| RTC Adjustment (sec./day) | Set the adjustment in seconds per day to correct the Real Time Clock (RTC). |
| Set | Save all the changes you made |
| Set & Exit | Click it to close the dialog box and accept all changes. |
| Cancel | Click it to close the dialog box and discard all changes. |
Need PM Designer itself?
V4 for current PK, PT, ITV and PM panels, V2 for older models. Free, sent by email.
Source.Section 20.2.4 of the PM Designer Software User Manual, Edition 2.0, © Cermate Technologies Inc. (www.cermate.com, service@cermate.com). Reproduced online, with the manual's own figures, by TSL Automation Solutions, authorised Cermate distributor, for users of Cermate HMI panels. PM Designer and PanelMaster are trademarks of Cermate Technologies Inc.
Text and figures are the manufacturer's and may describe features your panel or software version does not have. For a plain-language introduction read the PM Designer guide; for help with a specific panel contact TSL Automation.