
Section 20.2.8 · Chapter 20: Setting up Target Panel
FTP Server
To access files in the target panel from a remote site you need to do the
following:
1. Open Internet Explorer (or any other web browser) and enter the site address.
You will need to type ftp:// and then the IP address of the target panel. For
example, you can type it
as ftp://192.168.10.163. To set
the IP address of the target panel, please see
Section
20.2.2 for details.
2. The target panel (FTP site) requires a user name and password to login.
If the target panel has an application, the user needs to
enter a password defined in that application with sufficient user level to enter
the FTP site for reading/writing files.
Note: A user that can write files is able to
read files too.
If the target panel has no application, the user can remote access the FTP site by using the default password “123”.
After you have successfully logged on to the target panel (FTP site), you will
see the available files that you have permission to access. It will look very
similar to your Windows Explorer or My Computer view. From there, you can read
and write files from your local hard drive to the target panel (FTP site) and
vice versa. Keep in mind that you will need to have the appropriate permission
to perform file operations. These permissions will be assigned to the user
account in the target panel (FTP site).
To assign a user name and read/write permissions for the target panel (FTP
site), you can press the FTP/VNC button on the Panel Setup screen to bring out
the following sample screen:
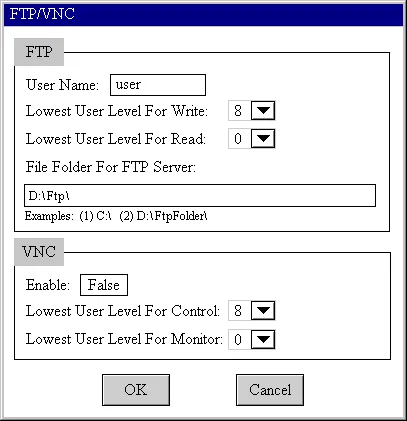
The FTP Site screen appears with the following options:
|
Property |
Description |
|---|---|
| User Name |
Specifies the user name for the target panel. You can
press the field to bring up the ASCII Character Keypad
to input up to 8 ASCII characters. The default user name
is “user”. |
| Lowest User Level for Write | Specifies the user level that is required to write files to the target panel. |
| Lowest User Level for Read | Specifies the user level that is required to read files from the FTP site. |
| File Folder For FTP Server | Press it to bring out the ASCII Character Keypad to enter the file folder. |
| OK | Click it to close the dialog box and accept all changes. |
| Cancel | Click it to close the dialog box and discard all changes. |
Need PM Designer itself?
V4 for current PK, PT, ITV and PM panels, V2 for older models. Free, sent by email.
Source.Section 20.2.8 of the PM Designer Software User Manual, Edition 2.0, © Cermate Technologies Inc. (www.cermate.com, service@cermate.com). Reproduced online, with the manual's own figures, by TSL Automation Solutions, authorised Cermate distributor, for users of Cermate HMI panels. PM Designer and PanelMaster are trademarks of Cermate Technologies Inc.
Text and figures are the manufacturer's and may describe features your panel or software version does not have. For a plain-language introduction read the PM Designer guide; for help with a specific panel contact TSL Automation.