
Section 20.2 · Chapter 20: Setting up Target Panel
Panel Setup
After power is applied, the target panel displays the Panel Setup screen. The following is an example of a Panel Setup screen:
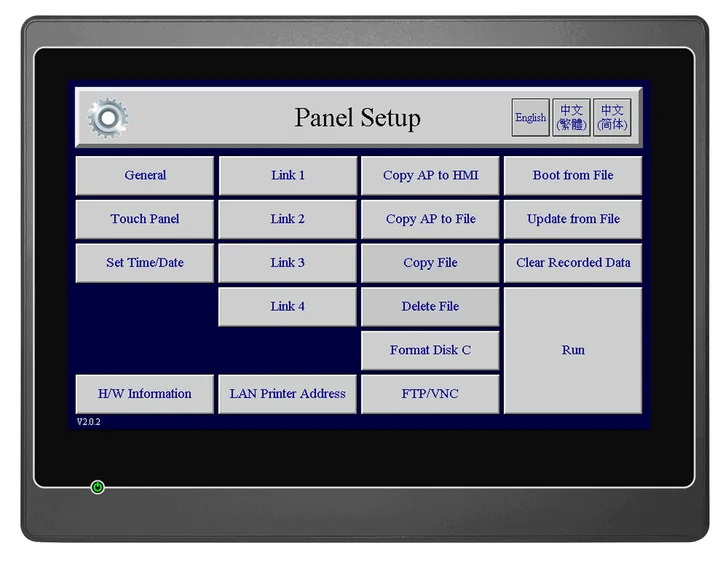
Note: Some of the buttons on the Panel Setup screen appear only when they are needed.
Note: After powering up, the target panel will not display the Panel Setup screen if "Run AP After Power On" in General Settings is True. If it is False, the target panel will run the application directly.
The following table describes the function of each button on the Panel Setup screen of the target panel.
|
Property |
Press the button to |
|---|---|
| English/中文(繁體)/中文(簡体) |
Display the texts of the screen in the corresponding
language. |
| General | Set the contrast and brightness of the display. Please see Section 20.2.2 for details. |
| Touch Panel | Calibrate the touch panel. Please see Section 20.2.3 for details. |
| Set Time/Date | Set the date and time on the Real Time Clock Chip. Please see Section 20.2.4 for details. |
| H/W Information |
Display the hardware information of the target panel.
The following is an example of the hardware information
screen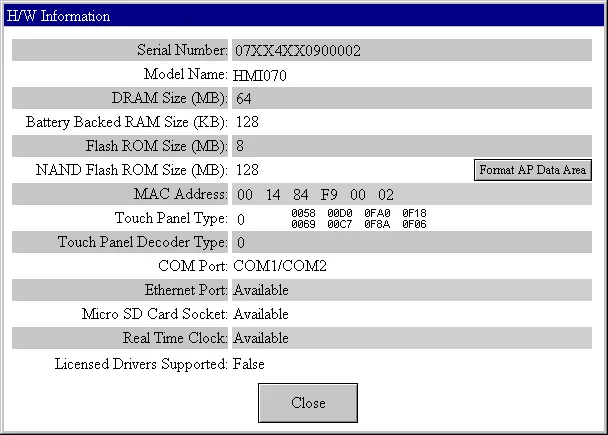 |
| Link 1 - Link 4 | Set the parameters for communication between the target panel and PLC/Controllers. Please see Section 20.2.5 or Section 20.2.6 for details. |
| LAN Printer Address | Specify the IP address of the network printer. Please see Section 20.2.7 for details. |
| Copy AP to HMI | Copy the application to another HMI. |
| Copy AP to File | Save the system programs and the application runtime data to a PRP file. The file can be used by the software and compatible target panels. |
| Copy File | Copy the file. |
| Delete File | Delete the file. |
| Format Disk C | Format the built-in flash disk (C:). This operation requires a user level of 8 or higher. |
| FTP/VNC | Assign the user name and the permission of the file operations for the target panel as a FTP site. Assign the permission of the remote control for the target panel as a VNC server. Please see Section 20.2.8 for details. |
| Boot from File | Load-and-run the system programs and the application runtime data from a PRP file. The original system programs and runtime data are intact. The loaded system programs and the runtime data will be lost after power off. |
| Update from File | Update the system programs and the application runtime data from a PRP file. The original system programs and the application runtime data are replaced by the new ones. |
| Clear Recorded Data | Clear the data stored in the battery backed RAM, which include the operation history, alarm history, alarm counts, and the data collected by data loggers. This operation requires a user level of 7 or higher. |
| Run | Start running the application. If login is required, the operator must enter a valid password of any user level before the target panel displays the first screen. The user level of the password you enter becomes the current user level. Any operation that requires a user level higher than the current user level will not work while the application is running. |
In this section
Need PM Designer itself?
V4 for current PK, PT, ITV and PM panels, V2 for older models. Free, sent by email.
Source.Section 20.2 of the PM Designer Software User Manual, Edition 2.0, © Cermate Technologies Inc. (www.cermate.com, service@cermate.com). Reproduced online, with the manual's own figures, by TSL Automation Solutions, authorised Cermate distributor, for users of Cermate HMI panels. PM Designer and PanelMaster are trademarks of Cermate Technologies Inc.
Text and figures are the manufacturer's and may describe features your panel or software version does not have. For a plain-language introduction read the PM Designer guide; for help with a specific panel contact TSL Automation.