
Section 4.1.11 · Chapter 4: Designing Screens
Drawing Picture Objects
- In the Draw menu or Draw toolbar, click Picture
 .
- Move the cursor onto the screen where you want to draw a picture object. A picture object with default settings will display and move along with the cursor.
- Click the desired position on the screen to place the picture object. The upper-left corner of the bounding box of the picture object will be at the clicked position.
- Double-click the picture object to bring up the Picture Object dialog box. Select a picture and define the settings for the picture object in the dialog box. Note that you can use the Picture toolbar to modify the properties of the picture object instantly. The following is an example of the Picture Object dialog box.
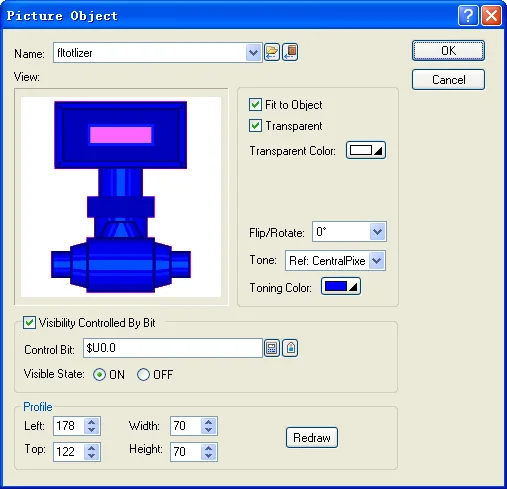
The following table describes each property in the Picture Object dialog box.
|
Property |
Description | ||
|---|---|---|---|
| Name |
The name of the picture that the object displays. You can use the drop-down list to select a picture
from the picture
database.
Click  to select a picture from a file. After the
selection, the
software imports the picture of the selected file
and saves the picture in the picture database. Click  to bring up the Select/Import from Library
dialog box.
Select a picture from a picture library file.
After the selection,
the software imports the selected picture from
the selected
library and saves the picture in the picture
database. |
||
| View | Shows the processed result of the selected picture according to the current settings. | ||
| Fit to Object | Check this item so the picture can change its size automatically to fit inside the object. | ||
| Transparent | Check this item to make parts of the picture transparent. The transparent parts are pixels whose colors are identical to the specified transparent color. This item is available when the picture is not a black and white picture. | ||
| Transparent Color | The transparent color. This item is available when the picture is not a black and white picture. | ||
| FG Color | The color to paint the black part of a black and white picture. This item is available when the picture is a black and white picture. | ||
| BG Color | The color to paint the white part of a black and white picture. This item is available when the picture is a black and white picture. | ||
| Flip/Rotate | Specifies the method to flip or rotate the picture before drawing it. There are 8 options: | ||
| Method | Description | ||
| 0° | Do nothing | ||
| 90° | Rotates the picture clockwise by 90 degrees | ||
| 180° | Rotates the picture clockwise by 180 degrees | ||
| 270° | Rotates the picture clockwise by 270 degrees | ||
| X | Flips the picture over the X axis | ||
| 90° & X | Rotates the picture clockwise by 90 degree and flips it over the X axis | ||
| Y | Flips the picture over Y axis | ||
| 90° & Y | Rotates the picture clockwise by 90 degree and flips it over the Y axis | ||
| Tone | Specifies the reference color to tone the picture before drawing it. The reference color is the color will be changed to the toning color. There are 4 options: | ||
| Reference Color | Description | ||
| None | Do nothing | ||
| Ref: CentralPixel | Use the color of the central pixel as the reference color. | ||
| Ref: Gray | Use gray (RGB:128,128,128) as the reference color. | ||
| Ref: LightGray | Use light gray (RGB:196,196,196) as the reference color. | ||
| Toning Color | The color to tone the picture. | ||
| Visibility Control | Visibility Controlled By Bit | Check this option if the picture will be shown or hidden by the specified bit. | |
| Control Bit |
Specifies the bit that shows or hides the picture
object. Click  to enter the bit address. Click  to enter the bit tag. |
||
| Visible State | Specifies the state (On or Off) that makes the picture visible. | ||
| Profile | Left | The X coordinate of the upper-left corner of the object. | |
| Top | The Y coordinate of the upper-left corner of the object. | ||
| Width | The width of the object. | ||
| Height | The height of the object. | ||
| Redraw | Click this button to redraw the object on the screen with the current settings. | ||
Need PM Designer itself?
V4 for current PK, PT, ITV and PM panels, V2 for older models. Free, sent by email.
Source.Section 4.1.11 of the PM Designer Software User Manual, Edition 2.0, © Cermate Technologies Inc. (www.cermate.com, service@cermate.com). Reproduced online, with the manual's own figures, by TSL Automation Solutions, authorised Cermate distributor, for users of Cermate HMI panels. PM Designer and PanelMaster are trademarks of Cermate Technologies Inc.
Text and figures are the manufacturer's and may describe features your panel or software version does not have. For a plain-language introduction read the PM Designer guide; for help with a specific panel contact TSL Automation.