
Section 4.2.2 · Chapter 4: Designing Screens
Basic Operations with the Selected Area
■ Moving Objects
Left-click anywhere inside the selected object and hold down the button. When
the cursor turns changes to
 , drag the mouse to move
the selection to another area of the screen. The selection will "float" over the
rest of the screen, allowing you to position it wherever you like. Release the
mouse button to "let go" of the selection.
■ Grouping or Ungrouping Objects
To group the selection, click
 on the edit toolbar, or
use the Group command on the Edit menu or on the object pop-up menu. After you
have grouped a selection that includes at least two objects, you can copy, move
or resize all objects in a group as a single unit. You can select an object
within the group and change its properties without ungrouping. You can also save
the group to the object library and use this object group in an animated
graphic.
To ungroup the selected group, click on the edit toolbar, or
use the Ungroup command on the Edit menu or on the object pop-up menu. After
ungrouping the objects, the objects within the group will be restored to the
single ones.
■ Resizing Objects
The square-shaped tabs around your object can be re-sized. You can resize by
clicking on the square-shaped tabs located at the corners and the middle
sections of the bound rectangle area and holding the mouse button down. When the
cursor changes to  or
 or
 or
 , drag the mouse to
change the size of the selection. Release the mouse button when the selection is
the size you like. You can make it bigger or smaller, and achieve a distorted
effect by "squashing" or "stretching" the selection to make it either
wider/narrower or taller/shorter than its original proportions.
Tip: You can’t resize more than one object at a time unless you group multiple
objects before resizing.
■ Auto Text Resizing
To automatically scale the text of the object when resizing the object, click on the edit toolbar if
it is raised, or use the Auto Text Resizing command on the Edit menu.
Tip: The Auto Text Resizing command is checked and the icon is sunken by
default. If you don’t want to resize the text when resizing the object, you need
to uncheck the Auto Text Resizing command or click the sunken icon to make the
font size fixed.
■ Pinning or Unpinning Objects
To pin the selection so that it cannot move, click
 on the edit toolbar, or
use the Pin command on the Edit menu or on the object pop-up menu.
To unpin the selection so that it can move again, click
 on the edit toolbar, or
use the Unpin command on the Edit menu or on the object pop-up menu.
Tip: Pinned objects can still be resized.
■ Copying or Cutting and Pasting Objects
To copy a selection from the current screen and place it on the Windows®
clipboard, press Ctrl+C, or click
 on the standard toolbar,
or use the Copy command on the Edit menu or on the object pop-up menu.
To cut a selection from the screen, press Ctrl+X, or click
 on the standard
toolbar, or use the Cut command on the Edit menu or on the object pop-up menu.
After Copying or Cutting, you can paste the selection by pressing Ctrl+V, or
click  on the standard
toolbar, or use the Paste command on the Edit menu or on the object pop-up menu.
|
To copy and paste the selection by mouse, press and hold down the Ctrl
key, and then left-click the selection and hold down the button. When
the cursor changes to
|
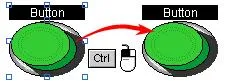 |
Tip: Cut and Paste are good for moving objects around within
the screen or to another screen.
Copy and Paste are good for duplicating objects from the current screen to other
screens.
By pasting multiple times on the current screen, you can achieve a cascading
effect.
By pasting once to a different screen, the position of the pasted object will be
the same as the copied object from the original screen.
■ Deleting Objects
To delete a selection, press Del, or use the Delete command on the Edit menu, or
on the object pop-up menu. When you use Delete, whatever is in the selection
will be deleted.
■ Undo
To reverse the last action, press Ctrl+Z, or use the Undo command on the Edit
menu.
■ Redo
To reapply the actions that were previously canceled by the Undo command, press
Ctrl+Z, or use the Redo command on the Edit menu.
■ Keyboard Shortcuts
| Shortcut | Operation | Shortcut | Operation | Shortcut | Operation |
|---|---|---|---|---|---|
| 【Ctrl+N】 | New Project | 【Ctrl+X】 | Cut | 【Ctrl+D】 | Duplicate |
| 【Ctrl+O】 | Open Project | 【Ctrl+C】 | Copy | 【Ctrl+F】 | Find |
| 【Ctrl+S】 | Save | 【Ctrl+V】 | Paste | 【Ctrl+R】 | Replace |
| 【Ctrl+Z】 | Undo | 【Ctrl+Click+move】 | Copy & Paste | 【Ctrl+A】 | Select All |
| 【Ctrl+Y】 | Redo | 【Del】 | Delete | 【Shift+Click】 | Multiple Select |
| 【Ctrl+Click】 | Reference Object Select |
Need PM Designer itself?
V4 for current PK, PT, ITV and PM panels, V2 for older models. Free, sent by email.
Source.Section 4.2.2 of the PM Designer Software User Manual, Edition 2.0, © Cermate Technologies Inc. (www.cermate.com, service@cermate.com). Reproduced online, with the manual's own figures, by TSL Automation Solutions, authorised Cermate distributor, for users of Cermate HMI panels. PM Designer and PanelMaster are trademarks of Cermate Technologies Inc.
Text and figures are the manufacturer's and may describe features your panel or software version does not have. For a plain-language introduction read the PM Designer guide; for help with a specific panel contact TSL Automation.