
Section 4.4.3.3 · Chapter 4: Designing Screens
Selecting Tags
To select a tag, you can click
 to bring up the Select
Tag dialog box as shown below.
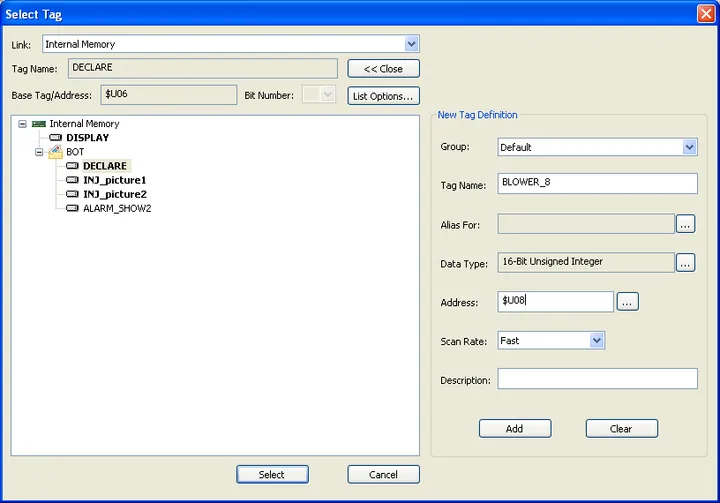
The following table describes each property in the Select Tag dialog box.
|
Property |
Description | ||
|---|---|---|---|
| Link | Click the down arrow and select a link from the drop down list. | ||
| Tag Name | Specifies the selected tag. | ||
| New Tag >> | Click the button to bring up New Tag Definition dialog box and create a new tag in it. | ||
| << Close | Click the button to close New Tag Definition dialog box. | ||
| Base Tag/Address | Specifies the base tag and address of the selected tag. | ||
| Bit Number | Specifies the bit number of the selected tag. | ||
| List Options... |
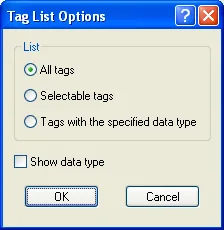
Click the button to bring up the following Tag List
Options dialog box.
|
||
| Options | Description | ||
| All tags | Select this option to list all the predefined bit tags and word tags. | ||
| Selectable tags | Select this option to show the selectable tags. When the specified address type is word, all the word tags will be listed. When the specified address type is bit, all the bit tags will be listed. | ||
| Tags with the specified data type | Select this option to show the tags with the same data type as the specified data type. | ||
| Show data type | Check this option if you want to show the tag follow by the data type. | ||
| Tag Tree |
Lists the predefined tags for the
selected link. To use a tag, you can double click the
selected tag.
Note: 1) All the listed tags and tag groups are created in the Tags Editor or by New Tag Definition dialog box. To create a tag, please see Section 2.3 Working with Tags. 2) Selectable tags are in bold. |
||
| New Tag Definition | Group | Click the down arrow and select a tag group from the drop down list. The selection "Default" indicates the current tag group. | |
| Tag Name | Specifies the name for the tag. | ||
| Alias For |
Click
 to bring up the Select Tag dialog box and select the
base tag for the new tag. |
||
| Data Type |
Click
to bring up the Select Data Type dialog box and select
the data type for the tag. |
||
| Address |
Click
to bring up the Address Input Keypad and specify the
desired address. |
||
| Scan Rate | Selects the scan rate for the tag from the dropdown list. | ||
| Description | Type a description for a tag. | ||
| Add | Click it to add a new tag. | ||
| Clear | Click it to clear the definition of the new tag. | ||
| Select | Click it to select the tag. | ||
| Cancel | Click it to close the dialog box and discard all changes. | ||
Need PM Designer itself?
V4 for current PK, PT, ITV and PM panels, V2 for older models. Free, sent by email.
Source.Section 4.4.3.3 of the PM Designer Software User Manual, Edition 2.0, © Cermate Technologies Inc. (www.cermate.com, service@cermate.com). Reproduced online, with the manual's own figures, by TSL Automation Solutions, authorised Cermate distributor, for users of Cermate HMI panels. PM Designer and PanelMaster are trademarks of Cermate Technologies Inc.
Text and figures are the manufacturer's and may describe features your panel or software version does not have. For a plain-language introduction read the PM Designer guide; for help with a specific panel contact TSL Automation.