
Section 3.1.1 · Chapter 3: Creating Panel Applications
General Setup - General Settings
This section describes how to define the general settings for a panel application. The following is an example of the General page of the General Setup dialog box.
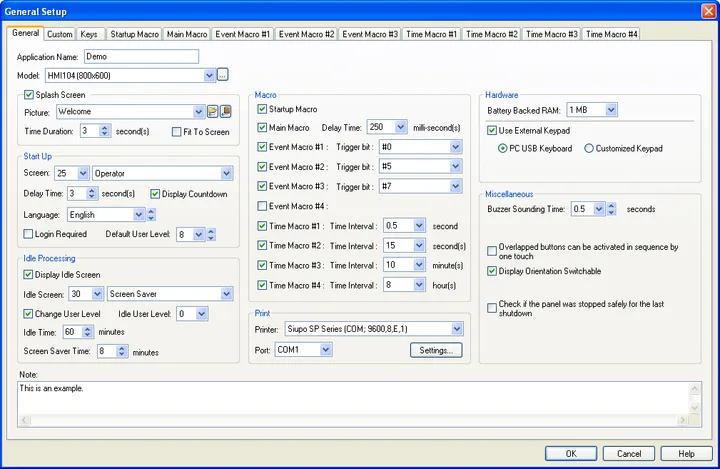
The following table describes each item in the General page.
|
Item |
Description | ||||
|---|---|---|---|---|---|
| Application Name | The name of the panel application. | ||||
| Model |
The model of the target panel. Click  to bring up the Panel Model dialog box which helps you
to select a model by specifying the size, resolution and
orientation of the display. The following is a sample of Panel Model dialog box. 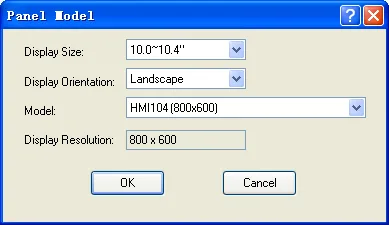 The supported display resolutions for the HMI Runtime are 800x600; 1024x600; 1024x758; 1280x720; 1280x800; 1280x1024; 1366x768; 1440x900; 1600x900; 1600x1200; 1680x1050; 1920x1080; 1920x1200; 2560x1440; 2560x1600. |
||||
| Splash Screen | <Check Box> | Check this option if you want a picture that appears while the application is loading. It can be an additional form of advertising. | |||
| Picture |
The name of the current picture. You can use the
drop-down list to select a picture from the picture
database. Click  to select a picture from a file as the current picture.
After the selection, the software imports the picture of
the selected file and saves the picture in the picture
database. Click  to bring up the Select/Import from Library dialog box.
Select a picture from a picture library file as the
current picture. After the selection, the software
imports the selected picture from the selected library
and saves the picture in the picture database. |
||||
| Time Duration | Specify how long you want to display the picture. | ||||
| Fit To Screen | Check this item so the picture can change its size automatically to fit the screen. | ||||
| Start Up | Screen | Specifies the first screen of the application that the target panel will display after powering up. | |||
| Delay Time | Specifies the time that the target panel will delay to run the application. | ||||
| Display Countdown | Check this option if you want the target panel to display countdown while it is waiting for the expiry of the Delay Time. | ||||
| Language | Specifies the language the application will display the text in after power up. | ||||
| Login Required | Check this option if you want the target panel to get a valid password from the operator before it displays the first screen. | ||||
| Default User Level | Available when Login Required is not selected. Specifies the initial user level for the application. | ||||
| Idle Processing | Display Idle Screen | Check this option to display the Idle Screen when the target panel has idled for the specified amount of time. | |||
| Idle Screen | Specifies the screen that will be displayed as the idle screen. | ||||
| Change User Level | Check this option to change the current user level when the idle screen is displayed. | ||||
| Idle User Level | Available when the Change User Level is selected. Specifies the user once the idle screen is displayed. | ||||
| Idle Time | The length of time used to determine when the idle screen is displayed. | ||||
| Screen Saver Time | Specifies the screen saver time. The target panel will turn off its backlight when it has not been operated by the operator for the specified amount of time. | ||||
| Note | You can type a note for the panel application. | ||||
| Macro | Startup Macro |
Check this item if you want the application to have the
Startup macro. The Startup macro is only run once when the application starts. The target panel will not display the start-up screen until the macro terminates. You can use Startup macro to initialize global data and settings for your application. |
|||
| Main Macro |
Check this item if you want the application to have the
Main macro. The Main macro runs concurrently with the application. The target panel runs the Main macro cyclically, i.e. it will delay preset time to run Main macro starting from the first command each time after processing the last command of the macro, or when it encounters an END command in the middle of the macro. |
||||
| Event Macro #1~#4 | An Event macro is run whenever the associated trigger bit changes from 0 (Off) to 1 (On). An application can have up to four Event macros. If the application needs an Event macro for a certain event, check one of the items that are available and specify the associated trigger bit for the corresponding Event macro. You can also select the trigger bit offered by the system, such as: MemStkInserted, MemStkRemoved, BatteryLow and BarCodeInputViaUsb. | ||||
| Time Macro #1~#4 | A Time macro is run periodically with a preset time interval. An application can have up to four Time macros. Each Time macro has a different set of time intervals that can be chosen to specify how often it runs. The following table describes the available time intervals for each Time macro. | ||||
| Time Macro | Available Time Intervals | Remark | |||
| #1 | 0.5 and 1 second | ||||
| #2 | 0.5, 1, 2, 3, ... and 59 seconds | ||||
| #3 | 1/120, 1/60, 1, 2, 3, ... and 59 minutes | The macro is run at 0 second. | |||
| #4 | 1/7200, 1/3600, 1, 2, 3, ... and 24 hours | The macro is run on the clock. | |||
| If the application needs a Time macro, check the item of an appropriate Time macro and specify the time interval for that Time macro. | |||||
| Printer | Specifies the type of printer that the application will use. An 800x480 screen can be printed in less than 15 seconds. | ||||
| Supported Printer | Tested Printer Model | Remark | |||
| BIXOLON SRP-350 (USB) | Thermal receipt printer | ||||
| EPSON C79 (USB) | |||||
| EPSON C86 (USB) | |||||
| EPSON LQ-1600K (USB) | DPK300 Fuji printer | ||||
| EPSON LQ-300 (USB) | |||||
| HP LaserJet (Ethernet / USB) | HP 1606dn, Brother HL-2030, Brother HL-2070N, and Brother MFC-7840W. | Supports most of the HP and Brother printers that support PCL and PCL 5e | |||
| Siupo SP Series (COM / PRT) | |||||
| SPRT A Series (COM / PRT) | |||||
| Port | Specifies the port of the target panel that will connect to the printer. | ||||
 |
If the printer is a mono printer, you can click it to
bring up the “Settings for Printing” dialog box which
helps you to select the colors to be printed in black.
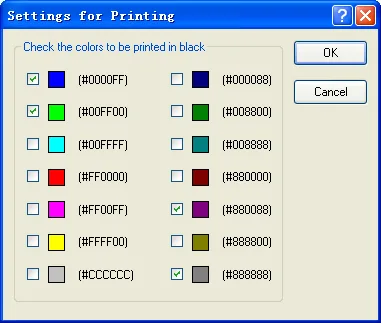
The following is a sample of Settings for Printing dialog box.
|
||||
| Hardware | Battery Backed RAM | Specifies the size of the battery backed RAM installed in the target panel. Note that the battery backed RAM is shared by the alarm logger, the operation logger, the data loggers, the recipe blocks, the system memory, and the nonvolatile user memory. | |||
| Flash ROM | Specifies the size of the flash ROM installed in the target panel. | ||||
| Use External Keypad |
Select this option if you want to use a customized keypad or a PC's
USB Keyboard as the external keypad for your HMI unit. Available only when the HMI unit supports the external keypad
connection.
When the external keypad is used, the touch operation is still supported. You can operate the HMI unit with the touch screen and the external keypad at the same time. If the PC USB Keyboard is selected, you can use Up, Down, Left, Right, and Tab keys to move the cursor to the desired object. To activate a button, move the cursor to the button and press Enter key. To enter numbers and characters, move the cursor to the associated object and use the keyboard to enter the data directly. The Up key and Down key of the external keypad could move the cursor not only up and down but also left and right. When the Up key cannot move the cursor up further, it will try to move the cursor to the left. Also when the Down key cannot move the cursor down further, it will try to move the cursor to the right. |
||||
| Miscellaneous | Buzzer Sounding Time | Specifies the length of the beep sounded by the buzzer when a touch operation is activated. | |||
| Overlapped buttons can be activated in sequence by one touch | Check this option if you want the application to have the overlapped buttons can be activated in sequence by one touch feature. This allows the operator to issue multiple data settings or commands with one touch. There are some constraints with using this feature. See Section 3.1.3 for details. | ||||
| Display Orientation Switchable |
Check this option to switch the screen
orientation at runtime. The run time orientation of a screen can be predefined in landscape or portrait. At run time, the display orientation of the window screens and the menu screens is determined by the orientation of the current normal screen. Note that not all the HMI units support this feature. Select the model in the properties page to see whether the feature is available or not. |
||||
| Support Text Anti-aliasing | Check this option to make X series HMI units support text anti-aliasing. | ||||
| Text without anti-aliasing | Text with anti-aliasing | ||||
 |
 |
||||
| Check if the panel was stopped safely for the last shutdown |
Check this option to configure the HMI unit to
check if the operator performed the safe stop
successfully for the last power-off with a
function button for "Stop Operation Safely ".
Please see
3.1.5 Avoiding Data Corruption Due To Random
Power-off for details. Note that the check occurs when the HMI starts running the application every time. |
||||
Need PM Designer itself?
V4 for current PK, PT, ITV and PM panels, V2 for older models. Free, sent by email.
Source.Section 3.1.1 of the PM Designer Software User Manual, Edition 2.0, © Cermate Technologies Inc. (www.cermate.com, service@cermate.com). Reproduced online, with the manual's own figures, by TSL Automation Solutions, authorised Cermate distributor, for users of Cermate HMI panels. PM Designer and PanelMaster are trademarks of Cermate Technologies Inc.
Text and figures are the manufacturer's and may describe features your panel or software version does not have. For a plain-language introduction read the PM Designer guide; for help with a specific panel contact TSL Automation.