
Section 3.9.3.1 · Chapter 3: Creating Panel Applications
Screen - General Page
This section describes how to define the general settings for a screen. The following is an example of the General page of the Screen Properties dialog box.
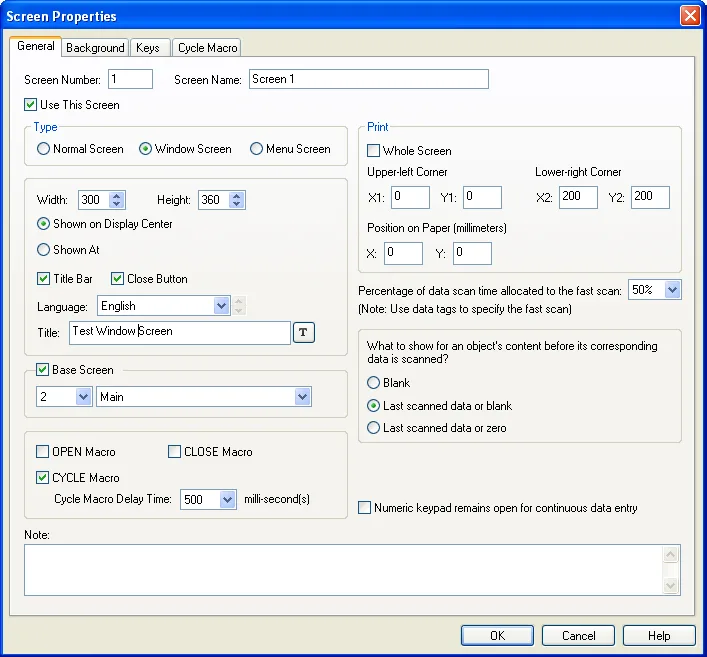
The following table describes each item in the General page.
|
Property |
Description | |
|---|---|---|
| Screen Number | The number of the screen. It must be between 1 and 7999. | |
| Screen Name | The name of the screen. | |
| Use This Screen | Check this option to use the screen. | |
| Type | Specifies the type of the screen. There are three types: Normal Screen, Window Screen and Menu Screen. Please see Section 3.9.1 for details. | |
| Width | Specifies the width (in pixels) of the screen. This field is available to edit when the Type is Window Screen and Menu Screen. | |
| Height | Specifies the height (in pixels) of the screen. This field is available to edit when the Type is Window Screen and Menu Screen. | |
| Shown on Display Center | Check this option to show the window screen on the display center. This field is available when the Type is Window Screen. | |
| Shown At | Check this option to show the window screen at the specified position. This field is available when the Type is Window Screen. | |
| X | Specifies the X coordinate of the window screen’s upper-left corner in pixels on the normal screen. | |
| Y | Specifies the Y coordinate of the window screen’s upper-left corner in pixels on the normal screen. | |
| Title Bar | Select this option to show a title bar with the specified title with the window screen when the Type is Window Screen. | |
| Close Button | Select this option for the window screen to have a close Button when the Type is Window Screen and the Title Bar field is checked. | |
| Language | Select a language to view and edit the settings of the title for that language. This field is available when the Type is Window Screen and Title Bar field is checked. | |
| Title |
Specifies the title or select the title from text
database for the Title Bar. Click
 to select the text
from text database. Click  to edit text. This field is
available when the Type is Window Screen and Title Bar
field is checked. |
|
| Base Screen | <Check Box> | Check this option to have a base screen for the current screen. |
| <Combo Box> | Specifies the screen to be a base screen. This field is available when the Base Screen is checked. | |
| OPEN Macro |
Check this item for the screen to have the OPEN macro. An Open Macro is run once when the associated screen is being opened. The target panel will not display the screen until the Open Macro terminates. Use OPEN macro to initialize global data and settings for the screen. |
|
| CLOSE Macro |
Check this item for the screen to have the CLOSE macro. A Close Macro is run once when the associated screen is being closed. The target panel will not erase the screen until the Close Macro terminates. |
|
| CYCLE Macro | <Check Box> |
Check this item for the screen to have the CYCLE macro. A Cycle Macro is run continuously while the associated screen is open. The target panel runs Cycle Macros cyclically, i.e. a Cycle Macro will run beginning with the first command each time after it completes the processing of the last command of the macro, or when it encounters an END command in the middle of the macro. The cycle macro terminates immediately when the screen is closed. |
| Cycle Macro Delay Time | Specifies the delay time in 0, 100, 200, 300, 400, 500, 600, 700, 800, 900, 1000 millisecond for the cycle macro. | |
| Whole Screen | Check this item to print the whole screen by Command Flag or Function Button or Macro Command | |
| Upper-left | Specifies the X and Y coordinates in pixels for the upper-left corner of the screen’s printing area. The field is available when Whole Screen item is unchecked. | |
| Lower-Right | Specifies the X and Y coordinates in pixels for the lower-right corner of the screen’s printing area. The field is available when Whole Screen item is unchecked. | |
| Position on Paper | Specifies the X and Y coordinates in millimeters for the position where the specified area of the screen will print on paper. | |
| Percentage of data scan time allocated to the fast scan |
Select the percentage of data scan time allocated to the
fast scan among 50%, 66%, 75%, 80%, 86% and 90%.
Note: With a bigger percentage, the data scan time is faster to the tag with fast scan rate. However, data scan time is slower to the tag with normal scan rate. |
|
| What to show for an object’s content before its corresponding data is scanned for the object? | Blank | Select this item to show blank for an object’s content before its corresponding data is scanned for the object. |
| Last scanned data or blank | Select this item to show last scanned data or blank for an object’s content before its corresponding data is scanned for the object. | |
| Last scanned data or zero | Select this item to show last scanned data or zero for an object’s content before its corresponding data is scanned for the object. | |
| Operable under window screens | Check this option to make the screen operable under window screen. This field is available only when the Type is Normal Screen. | |
| Operable under alarm message boxes | Check this option to make the normal screen operable under alarm message boxes. This field is available only when the Type is Normal Screen. | |
| Numeric keypad remains open for continuous data entry | Check this option for numeric keypad to remain open for continuous data entry. | |
| Note | Type a note for the screen. | |
Need PM Designer itself?
V4 for current PK, PT, ITV and PM panels, V2 for older models. Free, sent by email.
Source.Section 3.9.3.1 of the PM Designer Software User Manual, Edition 2.0, © Cermate Technologies Inc. (www.cermate.com, service@cermate.com). Reproduced online, with the manual's own figures, by TSL Automation Solutions, authorised Cermate distributor, for users of Cermate HMI panels. PM Designer and PanelMaster are trademarks of Cermate Technologies Inc.
Text and figures are the manufacturer's and may describe features your panel or software version does not have. For a plain-language introduction read the PM Designer guide; for help with a specific panel contact TSL Automation.