
Section 3.6.3 · Chapter 3: Creating Panel Applications
Command Block Settings (Type A)
This section describes how to configure the type A command block using the Command Block page of the Command & Status dialog box. The following is an example of the Command Block page.
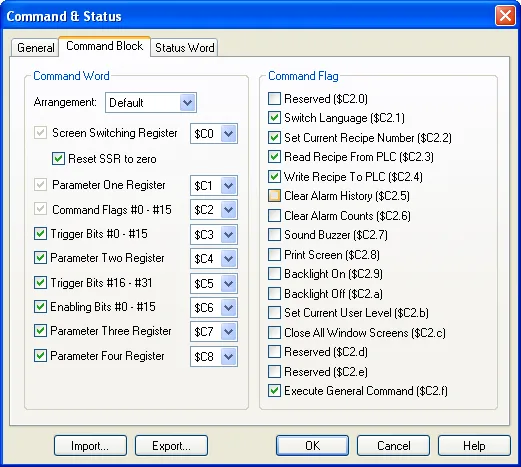
The following table describes each property in the Command Block page.
|
Property |
Description | ||
|---|---|---|---|
| Command Word | Arrangement | Select Default for the command words to be in the default order in the command block. Select Custom to arrange each command word in the command block by yourself. | |
| Screen Switching Register | Check this option to use the word to change the main screen, or display a window screen by setting the word to the number of the desired screen. | ||
| Reset SSR to Zero | If this option is selected, the panel always resets the Screen Switching Register to zero when it detects a nonzero value in the word. If this option is not selected, the panel resets the Screen Switching Register to zero only when the specified screen is valid and not yet displayed. | ||
| Parameter One Register | Check this option to use this word to specify the No. 1 parameter for the specified operation. | ||
|
Command Flags #0 - #15 (Command Flag Word) |
Check this option to use the command flags to request the panel to perform the specified operations. | ||
|
Trigger Bits #0 - #15 (Low Trigger Word) |
Check this option if any of the trigger bits in the word are needed for your application. | ||
| Parameter Two Register | Check this option to use this word to specify the No. 2 parameter for the specified operation. | ||
|
Trigger Bits #16 - #31 (High Trigger Word) |
Check this option if any of the trigger bits in the word are needed for your application. | ||
|
Enabling Bits #0 - #15 (Enabling Word) |
Check this option if any of the enabling bits in the word are needed for your application. | ||
| Parameter Three Register | Check this option to use this word to specify the No. 3 parameter for the specified operation. | ||
| Parameter Four Register | Check this option to use this word to specify the No. 4 parameter for the specified operation. | ||
| Command Flag | Switch Language (#1) |
Check this option to use command flag #1 to request the
panel to display the specified language. Specify the
following: 1) Parameter One Register: the number of the desired language |
|
| Set Current Recipe Number (#2) |
Check this option to use command flag #2 to request the
panel to set the current recipe number of the specified
recipe block to the specified recipe number. Specify the
following: 1) Parameter One Register: The recipe number 2) Parameter Two Register: The recipe block Note: You do not need to specify the recipe block if the application has only one recipe block. |
||
| Read Recipe From PLC (#3) |
Check this option to use command flag #3 to request the
panel to read a recipe from the specified address
defined in the Recipe Block dialog box, and use that
recipe to replace the specified recipe of the specified
recipe block. Specify the following: 1) Parameter One Register: The recipe number 2) Parameter Two Register: The recipe block Note: You do not need to specify the recipe block if the application has only one recipe block. |
||
| Write Recipe To PLC (#4) |
Check this option to use command
flag #4 to request the panel to write the specified
recipe of the specified recipe block to the specified
address defined in the Recipe Block dialog box. Specify
the following: 1) Parameter One Register: The recipe number 2) Parameter Two Register: The recipe block Note: You do not need to specify the recipe block if the application has only one recipe block. |
||
| Clear Alarm History (#5) | Check this option to use command flag #5 to request the panel to clear the alarm history. | ||
| Clear Alarm Count (#6) | Check this option to use command flag #6 to request the panel to clear the alarm counts. | ||
| Sound Buzzer (#7) |
Check this option to use command flag #7 to request the
panel to sound its buzzer in the specified manner. Specify the following: 1) Parameter One Register: The sound type. The following table describes the sound type value. |
||
| Sound Type Value | Description | ||
| 0 | Continuous beep | ||
| 1 | 500ms beeps | ||
| 2 | 200ms beeps | ||
| 3 | 100ms beeps | ||
| 4 | 50ms beeps | ||
| Print Screen (#8) |
Check this option to use command flag #8 to request the
panel to print the specified screen. Specify the following: 1) Parameter One Register: the number of the screen to be printed Note 1: The top screen is printed if the number is zero or if there is no Parameter One Register. |
||
| Backlight On (#9) | Check this option to use command flag #9 to request the panel to turn its backlight on. | ||
| Backlight Off (#10) | Check this option to use command flag #10 to request the panel to turn its backlight off. | ||
| Set Current User Level (#11) |
Check this option to use command flag #11 to request the
panel to set the current user level to the specified
one. Specify the following: 1) Parameter One Register: the user level |
||
| Close All Window Screens (#12) | Check this option to use command flag #12 to request the panel to close all window screens. | ||
| Execute General Command (#15) | Check this option to use command flag #15 to request the panel to perform the specified operation. See the Section 3.6.7 Using General Commands for details. | ||
Need PM Designer itself?
V4 for current PK, PT, ITV and PM panels, V2 for older models. Free, sent by email.
Source.Section 3.6.3 of the PM Designer Software User Manual, Edition 2.0, © Cermate Technologies Inc. (www.cermate.com, service@cermate.com). Reproduced online, with the manual's own figures, by TSL Automation Solutions, authorised Cermate distributor, for users of Cermate HMI panels. PM Designer and PanelMaster are trademarks of Cermate Technologies Inc.
Text and figures are the manufacturer's and may describe features your panel or software version does not have. For a plain-language introduction read the PM Designer guide; for help with a specific panel contact TSL Automation.