
Section 3.6.5 · Chapter 3: Creating Panel Applications
Command Block Settings (Type H)
This section describes how to configure the type H command block using the Command Block page of the Command & Status dialog box. The following is an example of the Command Block page.
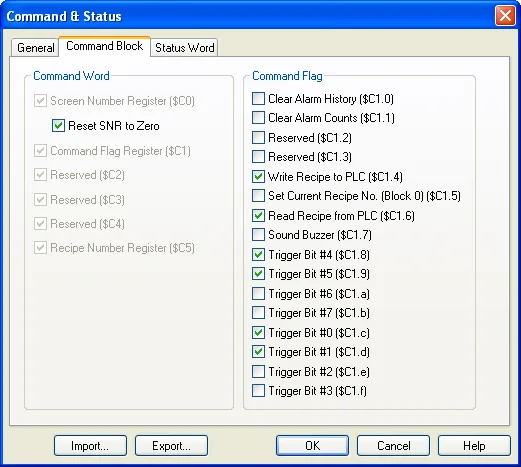
The following table describes each property in the Command Block page.
|
Property |
Description | ||
|---|---|---|---|
| Command Block | Screen Number Register |
Use the word to change the main screen, or display a
window screen by setting the word to the number of the
desired screen. You can also use this word to request
the panel to do the following operations: 1) Change the
language, 2) Turn on the backlight, and 3) Turn off the
backlight. The following table describes how to program this word. |
|
| Bit | Description | ||
| 0-9 | Specifies the screen to be displayed. 11-13 | ||
| 11-13 |
Specifies the language that the panel displays for. 000: The panel does nothing. 001: The panel changes the language to language 1. 010: The panel changes the language to language 2. ... 111: The panel changes the language to language 7. |
||
| 14 | If this bit is On, the panel turns off the back light of the display. | ||
| 15 | If this bit is On, the panel turns on the back light of the display. | ||
| Reset SNR to Zero | If this option is selected, the panel always resets the Screen Number Register to zero when it detects a nonzero value in the word. If this option is not selected, the panel resets the Screen Number Register to zero only when the specified screen is valid and not displayed yet. | ||
| Command Flag Register | Use the command flags to request the panel to do the specified operations. | ||
| Recipe Number Register | Use command flag #5 to set the current recipe number for recipe block #0, specify the recipe number in this word. | ||
| Command Flag | Clear Alarm History (#0) | Check this option to use command flag #0 to request the panel to clear the alarm history. | |
| Clear Alarm Counts (#1) | Check this option to use command flag #1 to request the panel to clear the alarm counts. | ||
| Write Recipe To PLC (#4) | Check this option to use command flag #4 to request the panel to write the current recipe of recipe block #0 to the specified address defined in the Recipe Block dialog box. | ||
| Set Current Recipe Number (#5) |
Check this option to use command flag #5 to request the
panel to set the current recipe number for recipe block
#0. Specify the following: 1) Recipe Number Register:?the recipe number |
||
| Read Recipe From PLC (#6) | Check this option to use command flag #6 to request the panel to read a recipe from the specified address defined in the Recipe Block dialog box, and use that recipe to replace the current recipe of recipe block #0. | ||
| Sound Buzzer (#7) | Check this option to use command flag #7 to request the panel to sound its buzzer. | ||
| Trigger Bit #4 (#8) | Check this option so command flag #8 will be used as trigger bit #4. | ||
| Trigger Bit #5 (#9) | Check this option so command flag #9 will be used as trigger bit #5. | ||
| Trigger Bit #5 (#10) | Check this option so command flag #10 will be used as trigger bit #6. | ||
| Trigger Bit #5 (#11) | Check this option so command flag #11 will be used as trigger bit #7. | ||
| Trigger Bit #5 (#12) | Check this option so command flag #12 will be used as trigger bit #0. | ||
| Trigger Bit #5 (#13) | Check this option so command flag #13 will be used as trigger bit #1. | ||
| Trigger Bit #5 (#14) | Check this option so command flag #14 will be used as trigger bit #2. | ||
| Trigger Bit #5 (#15) | Check this option so command flag #15 will be used as trigger bit #3. | ||
Need PM Designer itself?
V4 for current PK, PT, ITV and PM panels, V2 for older models. Free, sent by email.
Source.Section 3.6.5 of the PM Designer Software User Manual, Edition 2.0, © Cermate Technologies Inc. (www.cermate.com, service@cermate.com). Reproduced online, with the manual's own figures, by TSL Automation Solutions, authorised Cermate distributor, for users of Cermate HMI panels. PM Designer and PanelMaster are trademarks of Cermate Technologies Inc.
Text and figures are the manufacturer's and may describe features your panel or software version does not have. For a plain-language introduction read the PM Designer guide; for help with a specific panel contact TSL Automation.