
Section 3.1.2 · Chapter 3: Creating Panel Applications
General Setup - Custom Settings
This section describes how to define the customization settings for a panel application. The following is an example of the Custom page of the General Setup dialog box.
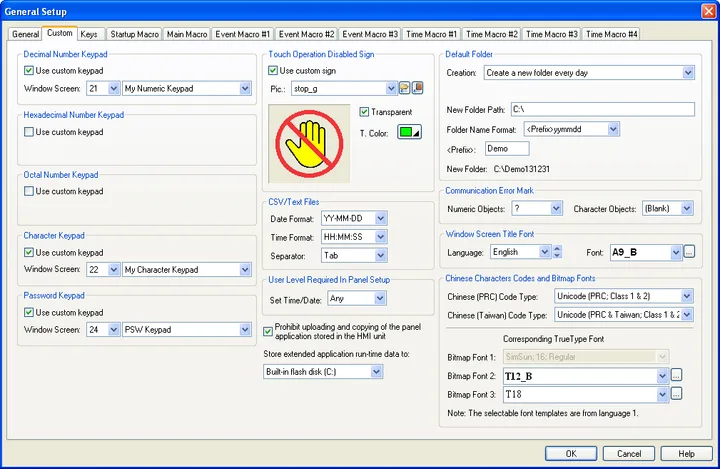
The following table describes each item in the Custom page.
|
Item |
Description | ||
|---|---|---|---|
| Decimal Number Keypad | Use custom keypad | Check this item if you want the application to use the custom keypad instead of the built-in keypad for the entry of decimal numbers. | |
| Window Screen | Specify the window screen that is designated as the decimal number keypad. | ||
| Hexadecimal Number Keypad | Use custom keypad | Check this item if you want the application to use the custom keypad instead of the built-in keypad for the entry of hexadecimal numbers. | |
| Window Screen | Specify the window screen that is designated as the hexadecimal number keypad. | ||
| Octal Number Keypad | Use custom keypad | Check this item if you want the application to use the custom keypad instead of the built-in keypad for the entry of octal numbers. | |
| Window Screen | Specify the window screen that is designated as the octal number keypad. | ||
| Character Keypad | Use custom keypad | Check this item if you want the application to use the custom keypad instead of the built-in keypad for the entry of characters. | |
| Window Screen | Specify the window screen that is designated as the character keypad. | ||
| Password Keypad | Use custom keypad | Check this item if you want the application to use the custom keypad instead of the built-in keypad for the entry of passwords. | |
| Window Screen | Specify the window screen that is designated as the password keypad. | ||
| Video Input | Signal Type | Select signal format of NTSC or PAL for a connected analog color camera. This field is only available for X series HMI unit. | |
| Record | Check this item if you want to record a video. | ||
| Compression | Select Low ratio (High resolution), Medium ratio (Medium resolution) or High ratio (Low resolution) as the compression ratio when recording. | ||
| Length | Select the last 6, 9, 12 or 15 minutes of the video view you want to keep in panel's NAND flash. | ||
| Touch Operation Disabled Sign | Use custom sign | Check this item if you want the application to display the custom sign instead of the built-in sign when the touch operation of an object is disabled. | |
| Pic. |
Specify the picture that is to replace the built-in
sign. Click  to select a picture from a file as the current picture.
After the selection, the software imports the picture of
the selected file and saves the picture in the picture
database. Click  to bring up the Select/Import from Library dialog box.
Select a picture from a picture library file as the
current picture. After the selection, the software
imports the selected picture from the selected library
and saves the picture in the picture database. |
||
| Transparent | Select this item if you want parts of the custom sign to be transparent. | ||
| T. Color | Specify the transparent color. | ||
| CSV/Text Files | Date Format | The date format that the target panel will use to output date information to text files. | |
| Time Format | The time format that the target panel will use to output time information to text files. | ||
| Separator | Select desired delimiter that can be TAB, semicolon(;), or comma(,) for CSV or Text files. | ||
| User Level Required in Panel Setup | Set Time/Date | The minimum user level that is required to set the time and date of the target panel through the target panel's Panel Setup menu. | |
| Prohibit uploading and copying of the panel application stored in the HMI unit | Check this option if you want to prohibit uploading and copying of the panel application stored in the HMI unit. | ||
| Store extended application run-time data to | Select Built-in flash disk (C:) or Micro SD card (D:) or USB memory stick (E:) to save the extended application run-time data. | ||
| Default Folder | This field is available only for the HMI Runtimes or the HMI with the flash disk. For HMI Runtimes, there are 4 kinds of default folder that you can select for your application. They are Use the application file's folder, Create the designated folder, Create a new folder every day and Create a new folder every month. For HMI with the flash disk, you can create the designated folder or a new folder every day or every month as the default folder . Please see Section 3.1.4 for details. | ||
| Communication Error Mark | Specify what to display for the Numeric Objects (including Numeric Entry and Numeric Display) and Character Objects (including Character Entry and Character Display) when their monitored data are unavailable due to communication errors. You can select the following options as the error mark. | ||
| Mark | Description | ||
| (As is) | No communication error mark for the object. Leaves the display unchanged. | ||
| (Blank) | Clears the display of the object. | ||
| ? | Displays a string of character ‘?’. | ||
| # | Display a string of character ‘#’. | ||
| Window Screen Title Font | Language | Select a language so you can view and edit the language dependent settings in the Window Screen Title Font group for that language. The language dependent properties in the group include Font. | |
| Font |
The corresponding font of the Window Screen Title. You can use the drop-down list to select a
font, or click
 to bring up the Font Templates dialog box and select a
font of the corresponding language. You can change the font templates before
selecting a font in that dialog box. |
||
| Chinese Characters Codes and Bitmap Fonts | Chinese (PRC) Code Type | Select code type for Simplified Chinese characters. There are two 2 types: Unicode (PRC; Class 1&2); Unicode (PRC; Class 1) | |
| Chinese (Taiwan) Code Type | Select code type for Traditional Chinese characters. There are 5 types: Big5 (Class 1); Big5 (Class 1 & 2);Unicode (Taiwan; Class 1); Unicode (Taiwan; Class 1&2); Unicode (PRC & Taiwan; Class 1&2) | ||
| Corresponding TrueType Font Bitmap Font #1 ~ #3 |
Select the corresponding TrueType font as a bitmap font
for the Chinese
characters displaying in the HMI units. You can use the drop-down list to select a
font, or click
to bring up the Font Templates dialog box and select a
font of language 1 as the bitmap font for the Chinese
display. You can change the font templates before
selecting a font in that dialog box. |
||
Need PM Designer itself?
V4 for current PK, PT, ITV and PM panels, V2 for older models. Free, sent by email.
Source.Section 3.1.2 of the PM Designer Software User Manual, Edition 2.0, © Cermate Technologies Inc. (www.cermate.com, service@cermate.com). Reproduced online, with the manual's own figures, by TSL Automation Solutions, authorised Cermate distributor, for users of Cermate HMI panels. PM Designer and PanelMaster are trademarks of Cermate Technologies Inc.
Text and figures are the manufacturer's and may describe features your panel or software version does not have. For a plain-language introduction read the PM Designer guide; for help with a specific panel contact TSL Automation.