TSL Automation Solutions Logo
Chapter 3: Creating Panel Applications: 54 topics
  1. 3.1Setting up the Panel Application
  2. 3.1.1General Setup - General Settings
  3. 3.1.2General Setup - Custom Settings
  4. 3.1.3Activating Multiple Overlapped Buttons by One Touch
  5. 3.1.4Specifying Default Folder for File I/O
  6. 3.1.5Avoiding Data Corruption Due To Random Power-off
  7. 3.2Working with Keys
  8. 3.2.1Default Key Settings for the Panel Application
  9. 3.2.2Key Settings for a Screen
  10. 3.2.3Key Usage Table Settings
  11. 3.2.4Usage Settings for a Key
  12. 3.3Internal Memory
  13. 3.3.1Types of Internal Memory
  14. 3.3.2Index Registers
  15. 3.3.3System Memory
  16. 3.3.4Setting up Internal Memory
  17. 3.4Communication Links
  18. 3.4.1Types of Communication Links
  19. 3.4.2General Settings for Commnunication Links
  20. 3.4.3Communication Parameter Settings (Serial Port)
  21. 3.4.4Communication Parameter Settings (Ethernet Port)
  22. 3.4.5Sub-link Settings
  23. 3.4.6Sharing Data among Panels Using Data Sharer
  24. 3.4.7Writing Communication Programs Using Macro Commands
  25. 3.4.8Using Gateway Server of the Target Panel
  26. 3.4.8.1Setting up Gateway Service
  27. 3.4.9Selecting Modbus Communication Drivers
  28. 3.4.10Accessing Internal Memory through Ethernet
  29. 3.4.11Accessing Siemens PLC through Ethernet
  30. 3.4.12Using the OPC UA Client Driver
  31. 3.5Sound Table
  32. 3.6Command Block and Status Words
  33. Types of Command Block and Status Words
  34. 3.6.1.1Command & Status - Type A
  35. 3.6.1.2Command & Status - Type H (Binary)
  36. 3.6.1.3Command & Status - Type H (BCD)
  37. 3.6.2Command & Status - General Settings
  38. 3.6.3Command Block Settings (Type A)
  39. 3.6.4Status Word Settings (Type A)
  40. 3.6.5Command Block Settings (Type H)
  41. 3.6.6Status Word Settings (Type H)
  42. 3.6.7Using General Commands
  43. 3.7Setting up Clock Operations
  44. 3.8Setting up Passwords
  45. Screens
  46. 3.9.1Types of Screens
  47. 3.9.2Creating and Opening Screens
  48. 3.9.3Setting up a Screen
  49. 3.9.3.1Screen - General Page
  50. 3.9.3.2Screen - Background Page
  51. 3.9.4Importing/Exporting a Screen
  52. 3.9.5Cutting/Copying/Pasting/Deleting a Screen
  53. 3.9.6Saving Screens as Pictures
  54. 3.9.7Protecting Screens
All 20 chapters →

Section 3.2.2 · Chapter 3: Creating Panel Applications

Key Settings for a Screen

Each screen can have its own key operation. You can allow a key to perform an operation only in the specified screen by changing the settings of the screen keys in the Screen Properties property sheet. To open the Screen Properties property sheet, please see Section 3.9.3 Setting up a Screen for details. The Screen Properties property sheet has the Keys page to set up the keys for the screen.

The following is an example of the Keys page and Usage Setup dialog in Screen Properties property sheet.
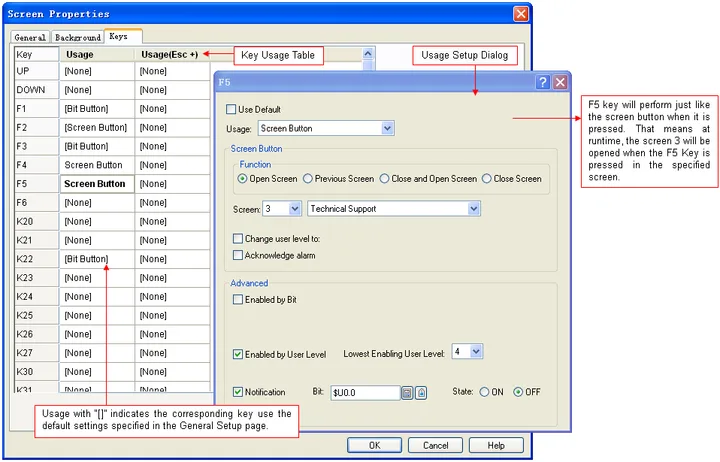
There are two parts in the above illustration: Key Usage Table and Usage Setup Dialog.

■ Key Usage Table
A table lists all the keys of the target panel and their usages. The key usage table is the same as the one in the Keys page of the General Setup property sheet when the screen is created. For details about Key Usage Table, please see Section 3.2.3.

■ Usage Setup Dialog
A floating dialog box allows you to specify the usage for the selected key or key combination. Left-click the cell in the key usage table to bring up the dialog box. The Use Default option is checked by default. Uncheck the Use Default option to assign a usage for the selected cell that will only be available in the specified screen. For details about Usage Setup Dialog, please see Section 3.2.4.

Need PM Designer itself?

V4 for current PK, PT, ITV and PM panels, V2 for older models. Free, sent by email.

Source.Section 3.2.2 of the PM Designer Software User Manual, Edition 2.0, © Cermate Technologies Inc. (www.cermate.com, service@cermate.com). Reproduced online, with the manual's own figures, by TSL Automation Solutions, authorised Cermate distributor, for users of Cermate HMI panels. PM Designer and PanelMaster are trademarks of Cermate Technologies Inc.

Text and figures are the manufacturer's and may describe features your panel or software version does not have. For a plain-language introduction read the PM Designer guide; for help with a specific panel contact TSL Automation.