
Section 3.8 · Chapter 3: Creating Panel Applications
Setting up Passwords
This section describes how to set up passwords for the panel application using the Passwords dialog box. The following is an example of the Passwords dialog box.
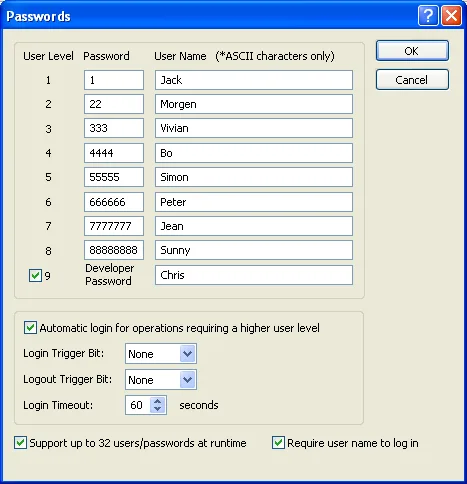
The following table describes each property in the Passwords dialog box.
|
Property |
Description |
|---|---|
| Password | The Password column contains 8 fields. Specify the password for a user level in the corresponding field. A password is a positive integer up to 8 digits. A password must be unique within the application. |
| User Name | Specify the user name so the operation logger is able to record who logs in. |
| 9 | Check this item if you want the developer password to be the password with the highest privilege. |
| Automatic login for operations requiring a higher user level | The password keypad will be displayed to enter a password for a higher user level when the operator touches an object that requires a higher user level than the current one in order to perform the programmed operation. |
| Login Trigger Bit | When the specified trigger bit changes from Off to On, the password keypad will be displayed to enter a password. The operator can enter a valid password or cancel the password keypad. |
| Logout Trigger Bit | When the specified trigger bit changes from Off to On, the current user level is reset to 0. |
| Login Timeout | The password keypad will close automatically when it gets no input from the operator for the specified time. |
| Support up to 32 users/passwords at runtime |
Check this option that a panel application can be
enabled to support up to 32 users/passwords. At runtime the HMI unit displays the password table as shown below to let the user manage user names and passwords. 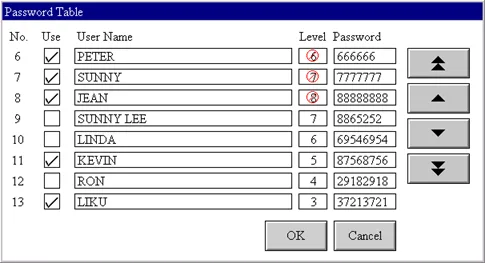 |
| Require user name to log in |
Check this option to make the login more secure. the
option is available only when the support of 32 users is
enabled.
At runtime the HMI unit displays the dialog box as shown below to ask the operator to enter name and password. 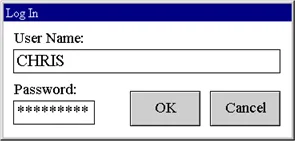 |
Need PM Designer itself?
V4 for current PK, PT, ITV and PM panels, V2 for older models. Free, sent by email.
Source.Section 3.8 of the PM Designer Software User Manual, Edition 2.0, © Cermate Technologies Inc. (www.cermate.com, service@cermate.com). Reproduced online, with the manual's own figures, by TSL Automation Solutions, authorised Cermate distributor, for users of Cermate HMI panels. PM Designer and PanelMaster are trademarks of Cermate Technologies Inc.
Text and figures are the manufacturer's and may describe features your panel or software version does not have. For a plain-language introduction read the PM Designer guide; for help with a specific panel contact TSL Automation.