
Section 3.5 · Chapter 3: Creating Panel Applications
Sound Table
The sound table contains all the sounds used by the panel application. The sound table is empty when the panel application is initially created.
In the application, you can use the function button with the play sound operation to play a specified sound.
Before using the sound in a panel application, import or add a sound into the Sound Table.
To open the Sound Table dialog box, please do one of the following:
- In the Project Manager window, double-click the Sound Table (
 )
node of the panel application.
- In the Project Manager window, right-click the Sound Table ()
node to bring out the pop-up menu and select Properties.
- On the Panel menu, click Sound Table…
The following is an example of the Sound Table dialog box.
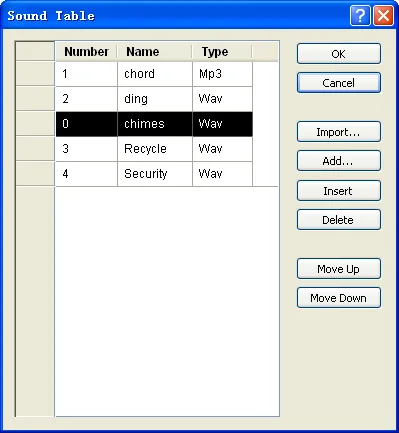
The following table describes how to read or use each of the items in the dialog box.
|
Item |
Description | |
|---|---|---|
| Sounds |
Lists the sounds for the panel application. Select a
sound as the current selection, or make multiple
selections. To select a sound, click the row of the
header column of the sound on the list. To select
multiple rows, click the row of the header column and
use Ctrl + Click to add a row to the selection. The following table describes each column in the sound list. |
|
| Column | Description | |
| Number | The number of the sound in the sound list. The number is an unsigned integer starting from 0. It must be unique in the panel application. The number can be edited by clicking the cell. | |
| Name | The name of the sound. Click the cell to select a predefined sound in the Sound Database from the drop down list. To know how to predefine sounds in the Sound Database, please see Section 2.2.4. | |
| Type | Displays the type of sound. | |
| OK | Close the dialog box and accept all changes to the sound table. | |
| Cancel | Close the dialog box and discard all changes to the sound table. | |
| Import… | Import a sound from a sound file. The types of importable sound files include: WAV and MP3. | |
| Add | Add a sound from the Sound Database to the end of the sound table. To know how to use the Sound Database, please see Section 2.2.4. | |
| Insert | Insert a sound from the Sound Database before the selection. To know how to use Sound Database, please see Section 2.2.4. This button is available when the selection is made. | |
| Delete | Delete all the selections. This button is available when the selection is made. | |
| Move Up | Move the selection one item down in the list. This button is available when the selection is made. | |
| Move Down | Move the selection one item up in the list. This button is available when the selection is made. | |
Need PM Designer itself?
V4 for current PK, PT, ITV and PM panels, V2 for older models. Free, sent by email.
Source.Section 3.5 of the PM Designer Software User Manual, Edition 2.0, © Cermate Technologies Inc. (www.cermate.com, service@cermate.com). Reproduced online, with the manual's own figures, by TSL Automation Solutions, authorised Cermate distributor, for users of Cermate HMI panels. PM Designer and PanelMaster are trademarks of Cermate Technologies Inc.
Text and figures are the manufacturer's and may describe features your panel or software version does not have. For a plain-language introduction read the PM Designer guide; for help with a specific panel contact TSL Automation.