
Section 3.9.6 · Chapter 3: Creating Panel Applications
Saving Screens as Pictures
This section describes how to save screens as pictures.
■ Saving a screen as a picture
To save a current screen as the bmp or jpg file, you can do the following.
- Open and activate the screen as a current screen
- Right click anywhere on the current screen, and then click Save Current
Screen as Picture… on the pop-up menu.
- or -
On the Screen menu, click Save Current Screen as Picture…
■ Saving multiple screens as pictures
You can also use the Save Screens as Pictures dialog box to save a screen or
multiple screens as bmp or jpg files. To open the dialog box, click Save Screens
as Pictures… on the Screen menu.
The following is an example of the Save Screens as Pictures dialog box.
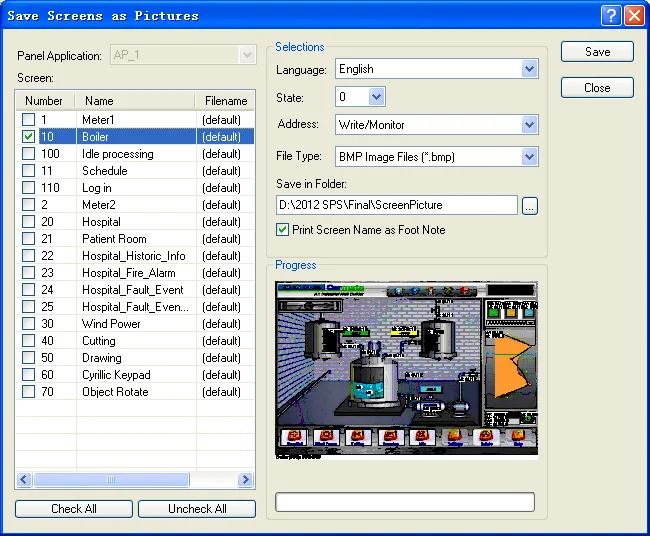
The following table describes each item in the dialog box.
|
Property |
Description | ||
|---|---|---|---|
| Panel Application | The application Name. | ||
| Screen |
The screen list shows
all the screens in the panel application. Click
the column header to sort
the items. The following table describes each column in the screen list. |
||
| Column | Description | ||
| Number | The screen number. Check the box before the screen number to save the screen as a picture file. | ||
| Name | The screen name. | ||
| Filename |
The Filename. The default filename is Screen
Name+Language Name+S+State Number.
Note: If any of the characters such as /\:*?"<>| in the screen name, they will be converted to underscore ( _ ). |
||
| Check All | Click the button to check all the screens. | ||
| Uncheck All | Click the button to uncheck all the screens. | ||
| Selections | Language | The language used to display the text of objects. | |
| State | The state that displays the state of objects. | ||
| Address | Select the address type to display the corresponding address of objects. There are 8 address types: None, Write/Monitor, Write, Monitor, read, Notification, touch Operation Control, and Visibility Control. | ||
| File Type | Select the file type. There are two types: bmp and jpg. | ||
| Save in Folder | Specifies the folder to locate the files. If the file exists in the folder, it will be replaced by the new one. | ||
| Print Screen Name as Foot Note | Check this option to display general screen information, such as foot note. The format of the foot note is Screen Name (#Screen Number); Screen WidthXScreen Height. | ||
| Progress | <Screen View> | Show the selected screen or the screen which is being saved. To select a screen, click its row in the screen list. | |
| <Progress Bar> | Show the saving progress after the Save button is clicked. | ||
| Save | Click the button to save all the selections with the specified conditions. | ||
| Close | Click the button to exit the dialog box. | ||
Need PM Designer itself?
V4 for current PK, PT, ITV and PM panels, V2 for older models. Free, sent by email.
Source.Section 3.9.6 of the PM Designer Software User Manual, Edition 2.0, © Cermate Technologies Inc. (www.cermate.com, service@cermate.com). Reproduced online, with the manual's own figures, by TSL Automation Solutions, authorised Cermate distributor, for users of Cermate HMI panels. PM Designer and PanelMaster are trademarks of Cermate Technologies Inc.
Text and figures are the manufacturer's and may describe features your panel or software version does not have. For a plain-language introduction read the PM Designer guide; for help with a specific panel contact TSL Automation.